iFlex Payroll – Help Center
Step-by-step guidance for all system features
Register a Business (Create a Company Account)
Registering creates a company account in iFlex Payroll. After you submit the form, you will receive an email with your login credentials and a link to access your company.
Before you start
- Have your company details ready (company name, address, contact person, business number, etc.).
- Use an email address you can access — your login details will be sent there.
- The Remarks field is optional (you can leave it blank).
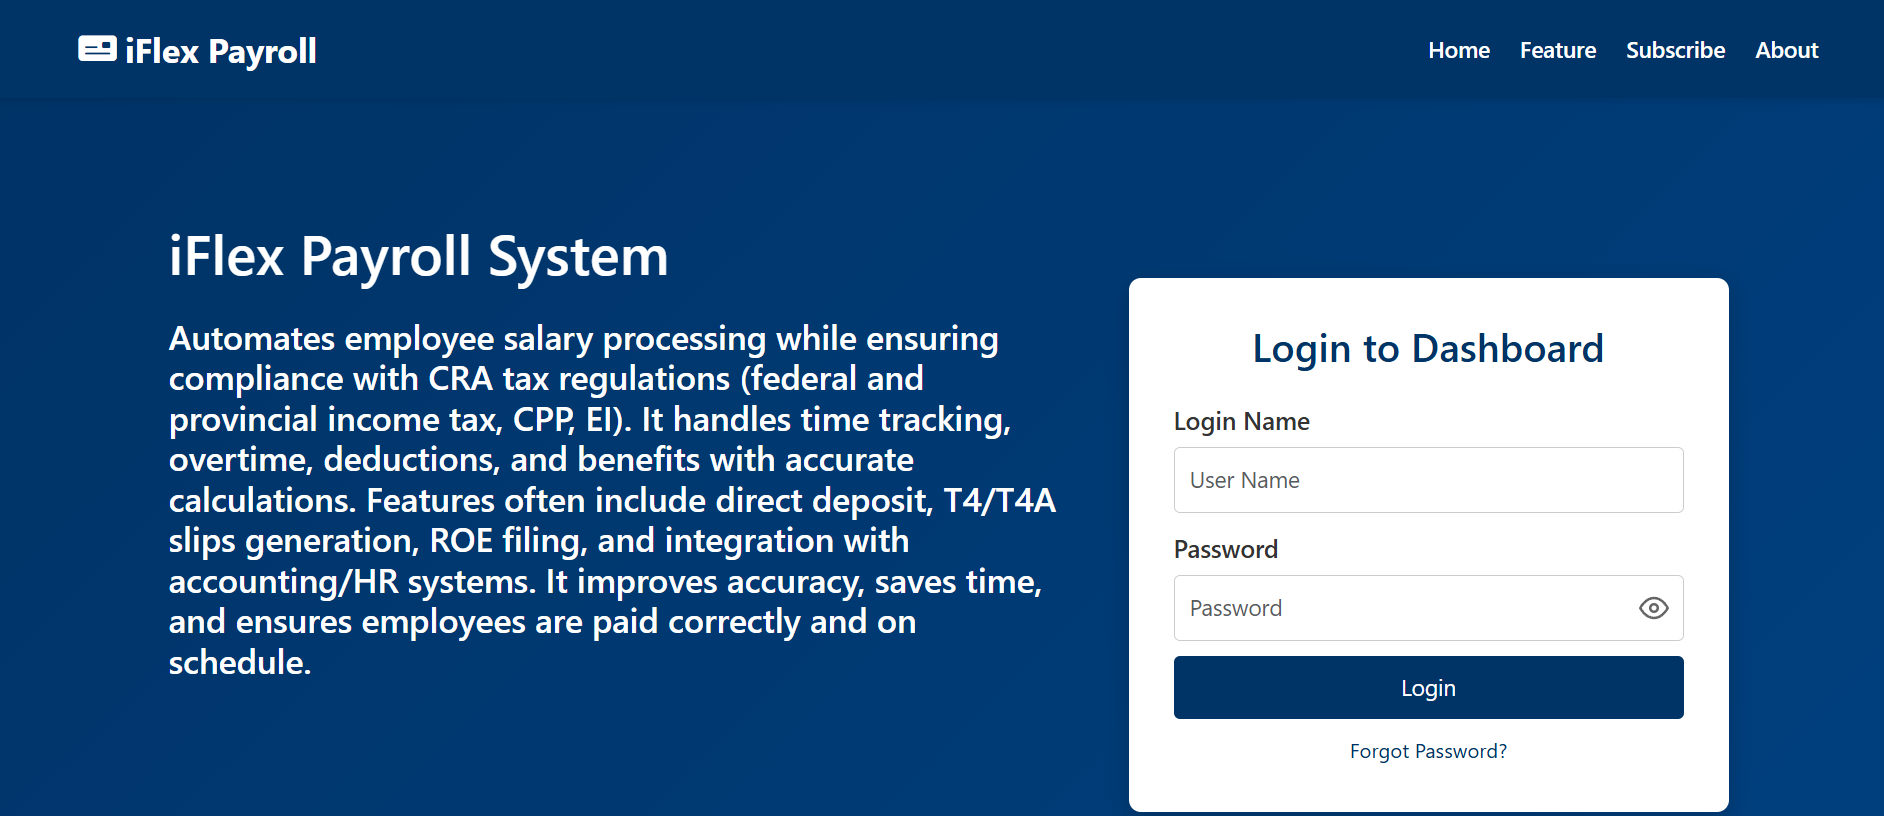
Step 1: Open the iFlex Payroll Website
When you first open the website, you’ll see the homepage. To start registration, you can either scroll down or click Subscribe from the top menu.
Step 2: Go to the Subscribe / Registration Section
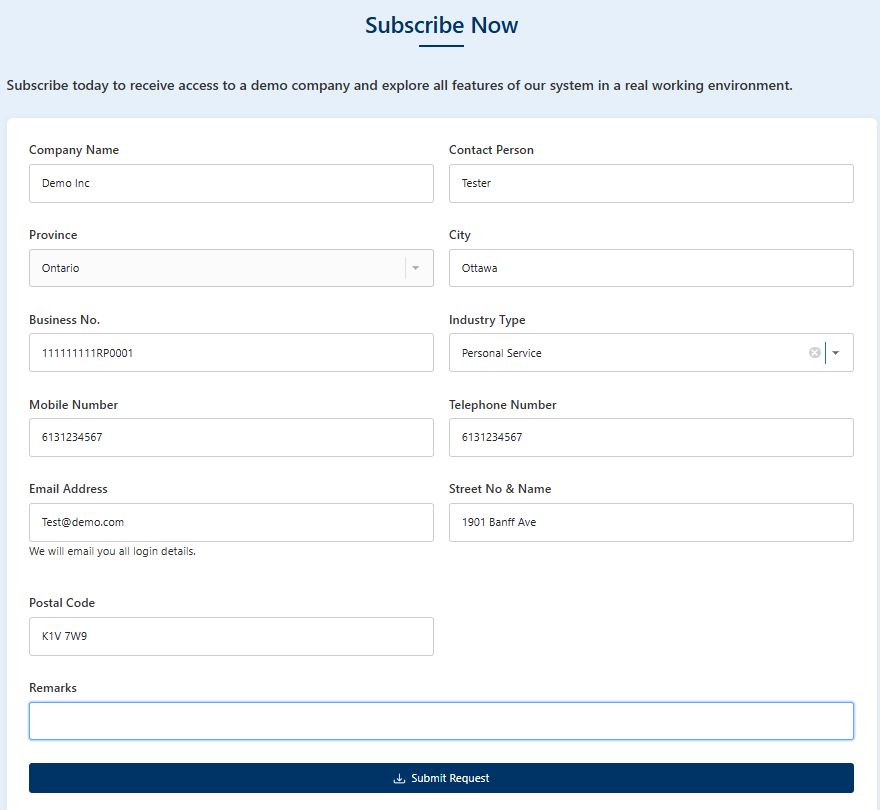
After you click Subscribe (or scroll down), you’ll land on the Subscribe Now section. This is where you register your company.

Step 3: Fill in Your Company Information
Enter your company’s exact information in the form fields (do not copy demo/sample values). The system uses this information to set up your company profile.
- Company Name + Contact Person
- Province + City
- Business No. + Industry Type
- Mobile Number + Telephone Number
- Email Address (this is where login details are sent)
- Street No & Name + Postal Code
Remarks is optional — use it if you want to add notes, otherwise leave it blank.
Step 4: Submit Your Registration
Click Submit Request. A 30-day trial company will be created for you, including demo/test employees so you can explore the system.
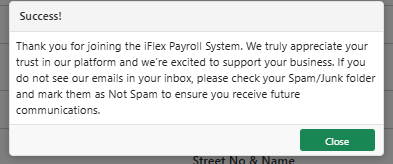
Step 5: Confirm the Success Message
After submitting, you will see a success popup confirming the request was created. If you do not receive an email, check your Spam/Junk folder.
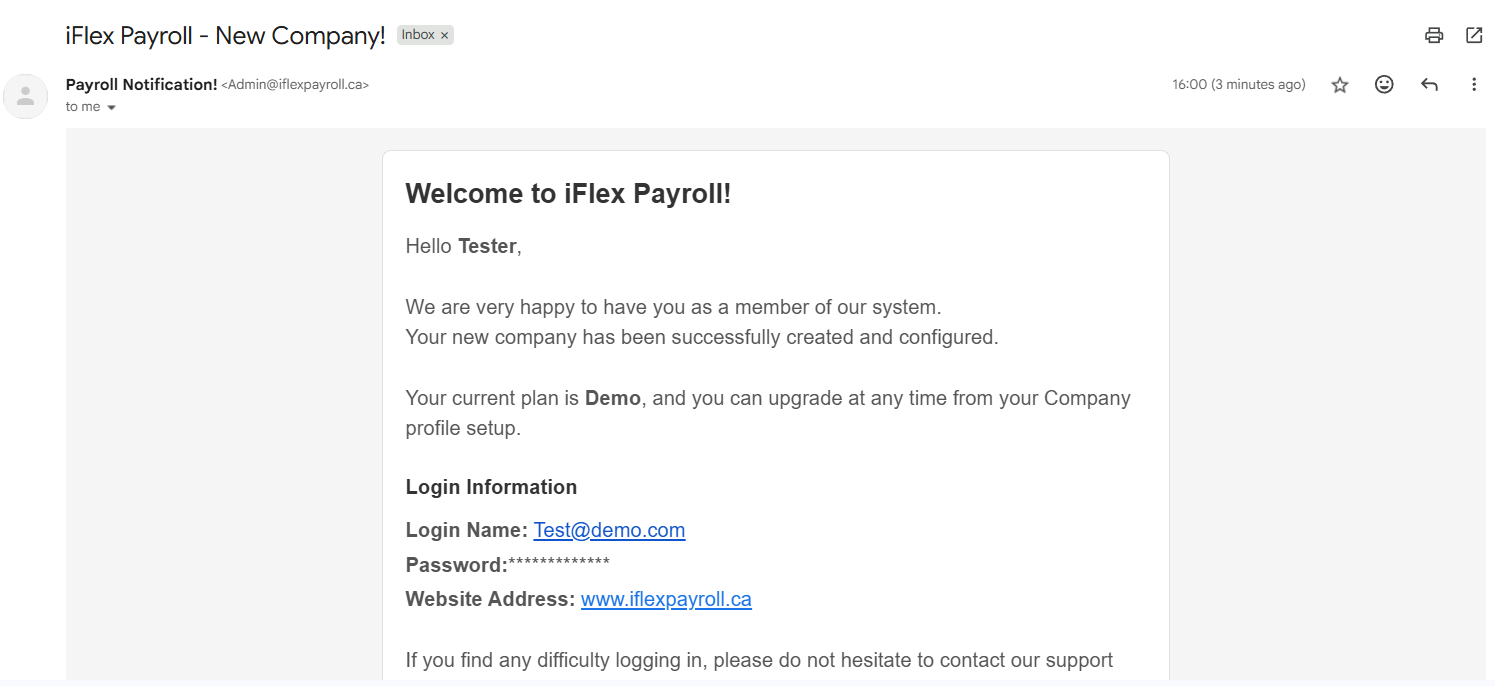
Step 6: Open the Email and Log In
Open the email you receive from iFlex Payroll. It includes: (1) your Login Name (email), (2) your Password, and (3) the Website Address link.
Click the website link, then log in using the credentials provided in the email.
Next: Add Employees and System Users
Your company registration creates the company account. To add users/workers and assign access, continue to the next guide: 👉 Users & Permissions Help
Troubleshooting
- No email received: check your Spam/Junk folder, then try again or contact support.
- Wrong company info: contact support to update your company profile after creation.
- Need to create a worker: workers/users are created inside the system under Users & Permissions.
Login to Your Company
Use this guide to log in to iFlex Payroll after your company has been registered. You will need the credentials that were sent to you by email, or your updated password if you changed it.
What you need before logging in
- Your Login Name (this is your email address).
- Your Password (from the registration email or your updated password).
- An active company account.
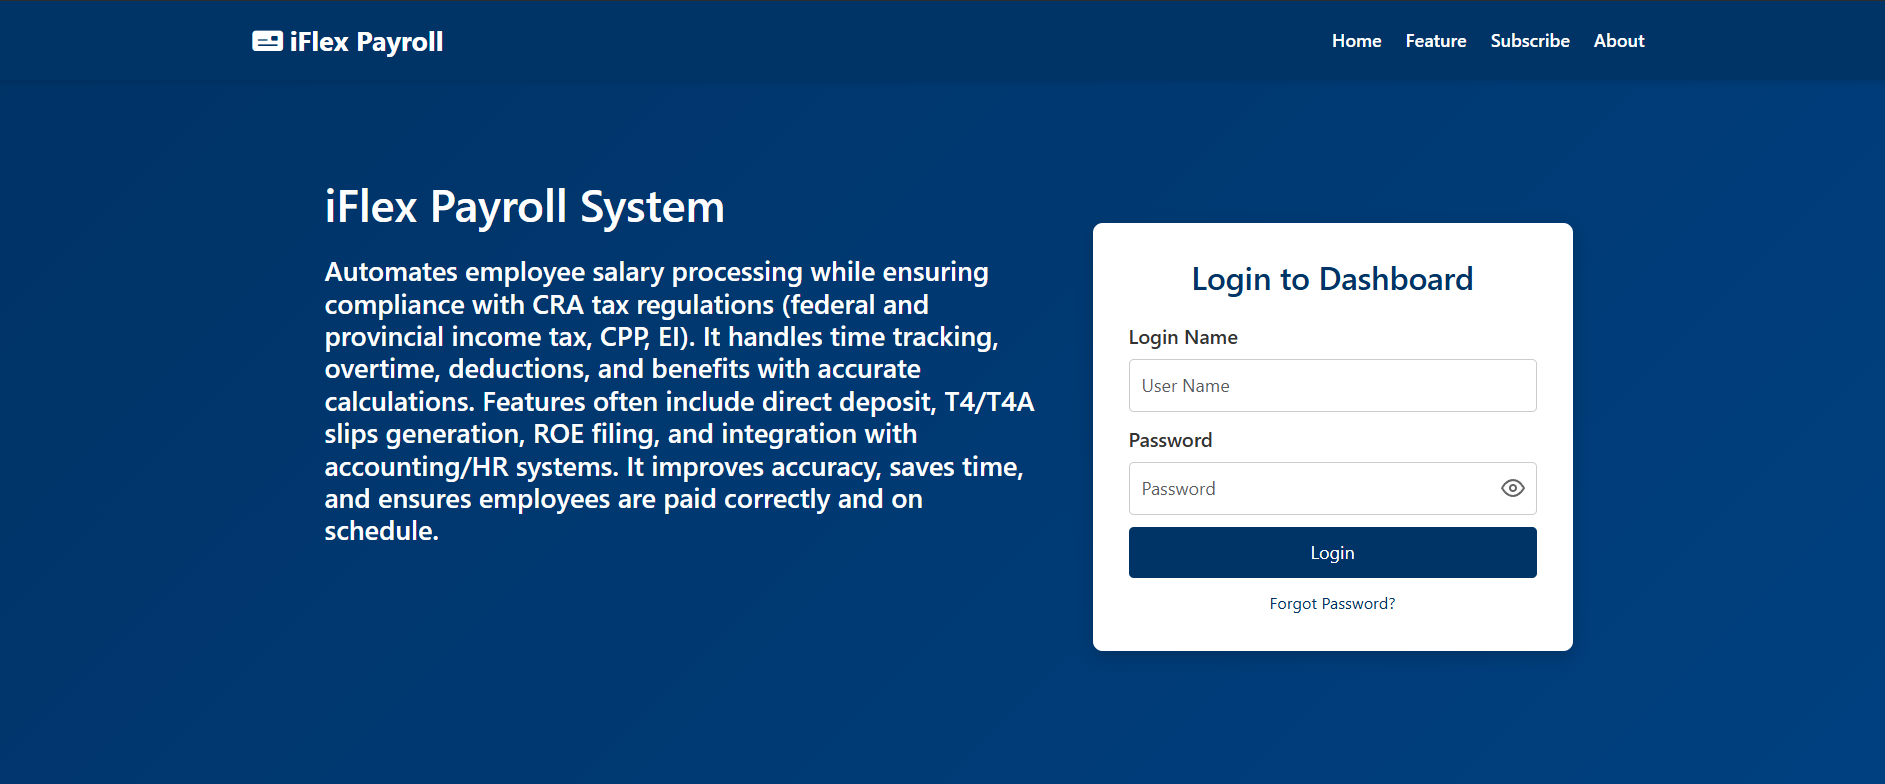
Step 1: Open the iFlex Payroll Website
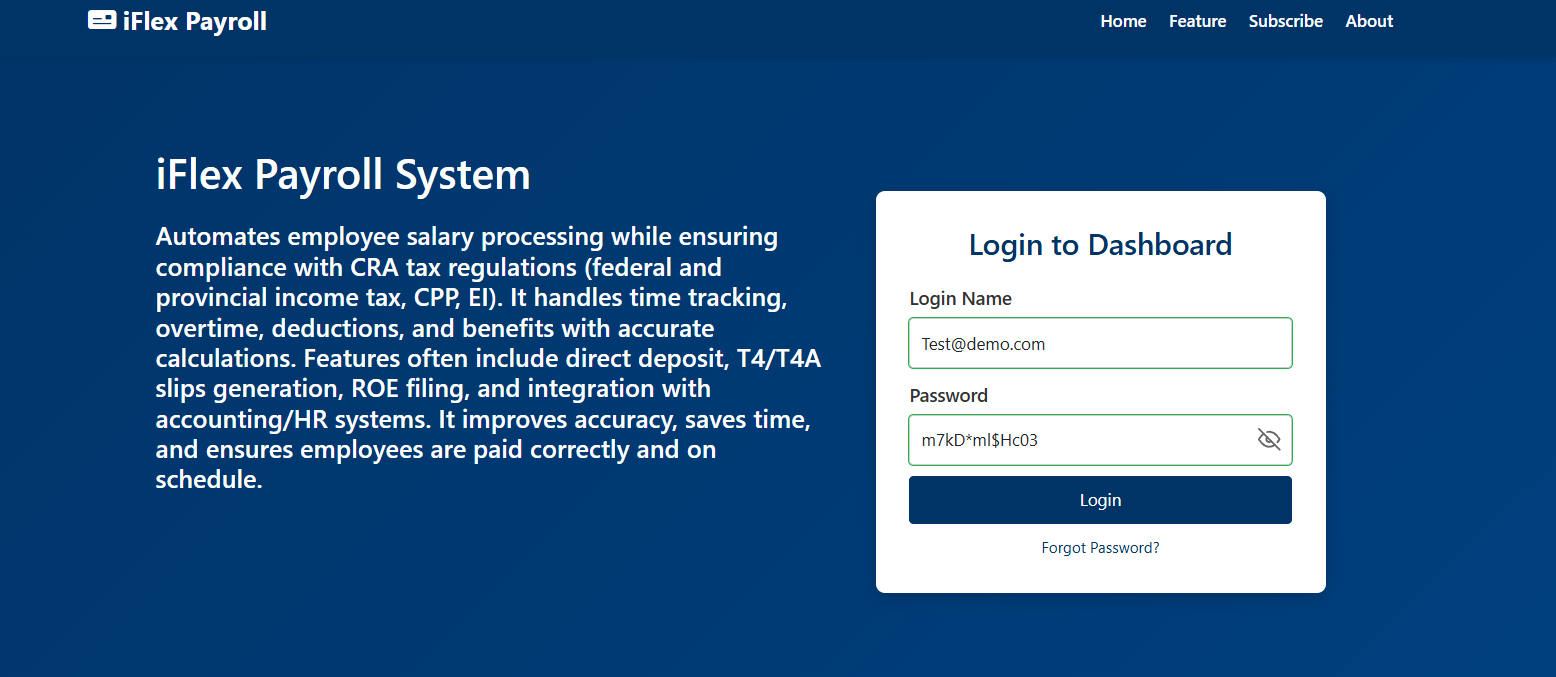
Go to the iFlex Payroll website. The homepage displays the Login to Dashboard panel.
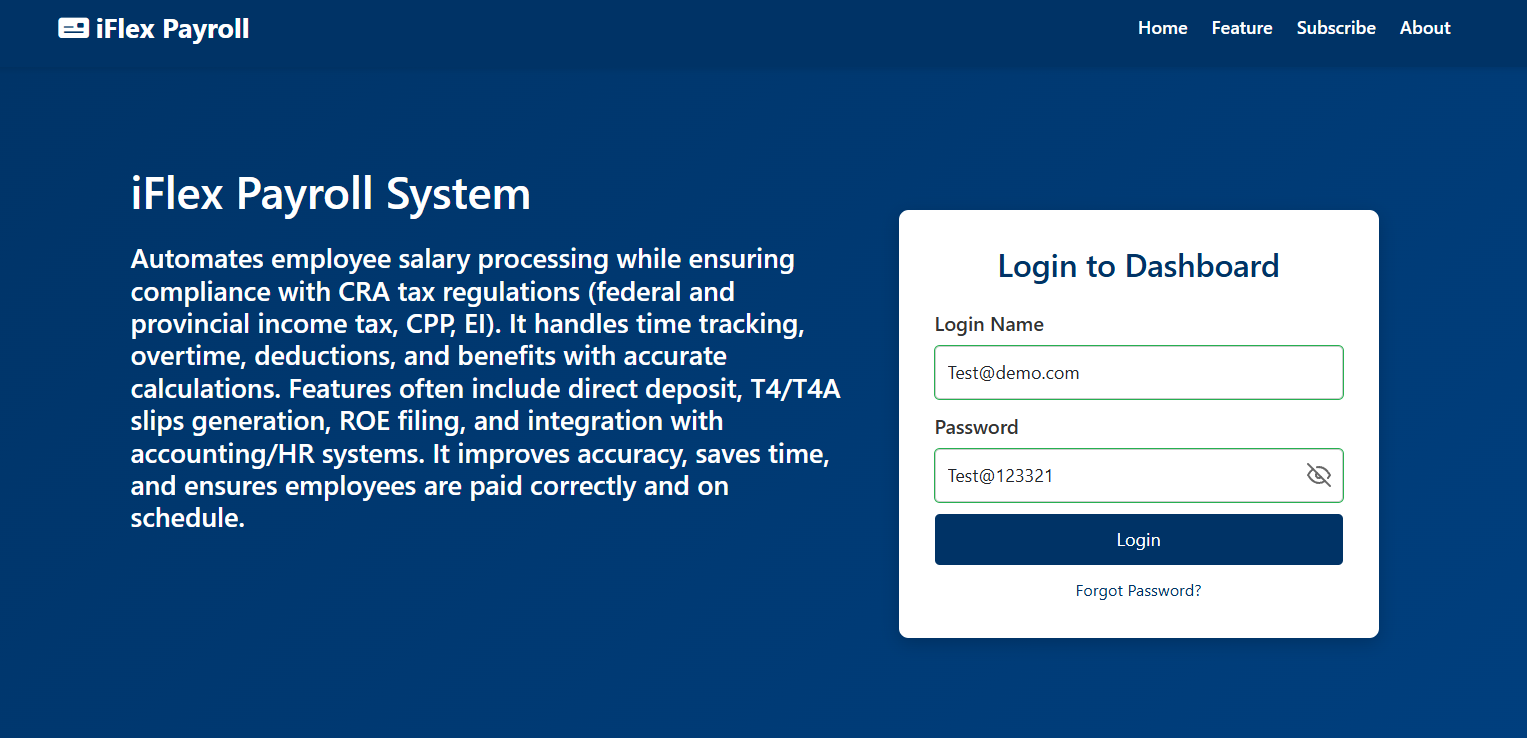
Step 2: Enter Your Login Credentials
In the login panel, enter the credentials provided to you:
- Login Name: Enter your email address.
- Password: Enter the password from your email, or your new password if you changed it.
Step 3: Access Your Company Dashboard
After clicking Login, you will be taken directly to your company dashboard. From there, you can manage employees, payroll, reports, and system settings.
Troubleshooting Login Issues
- Forgot your password? Click Forgot Password? on the login screen.
- Incorrect password: Make sure Caps Lock is off and try again.
- Can’t log in: Ensure you are using the email associated with your company account.
Change / Reset Password
Use this guide if you forgot your password, or if you need to reset it using a temporary password. The process is the same for both cases.
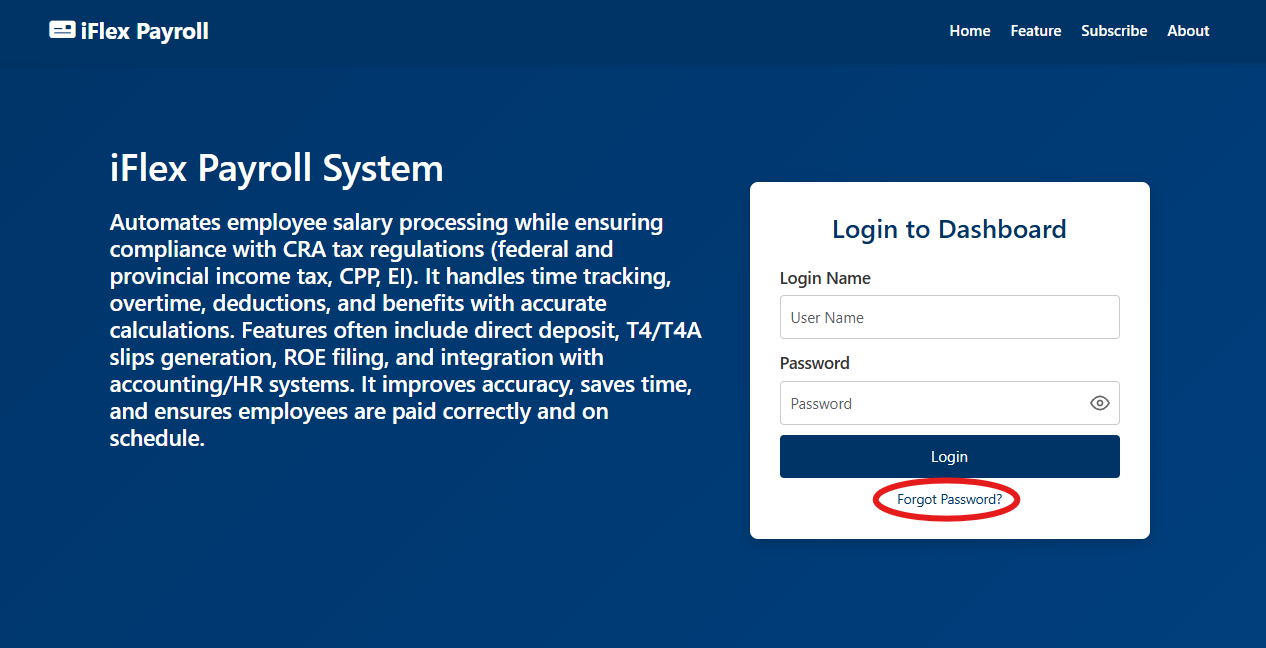
Step 1: Click “Forgot Password?” on the Login Page
On the login panel (homepage), click Forgot Password?.
Step 2: Enter your registered email
Enter the email address that is registered to your company/admin account, then click Reset Password.
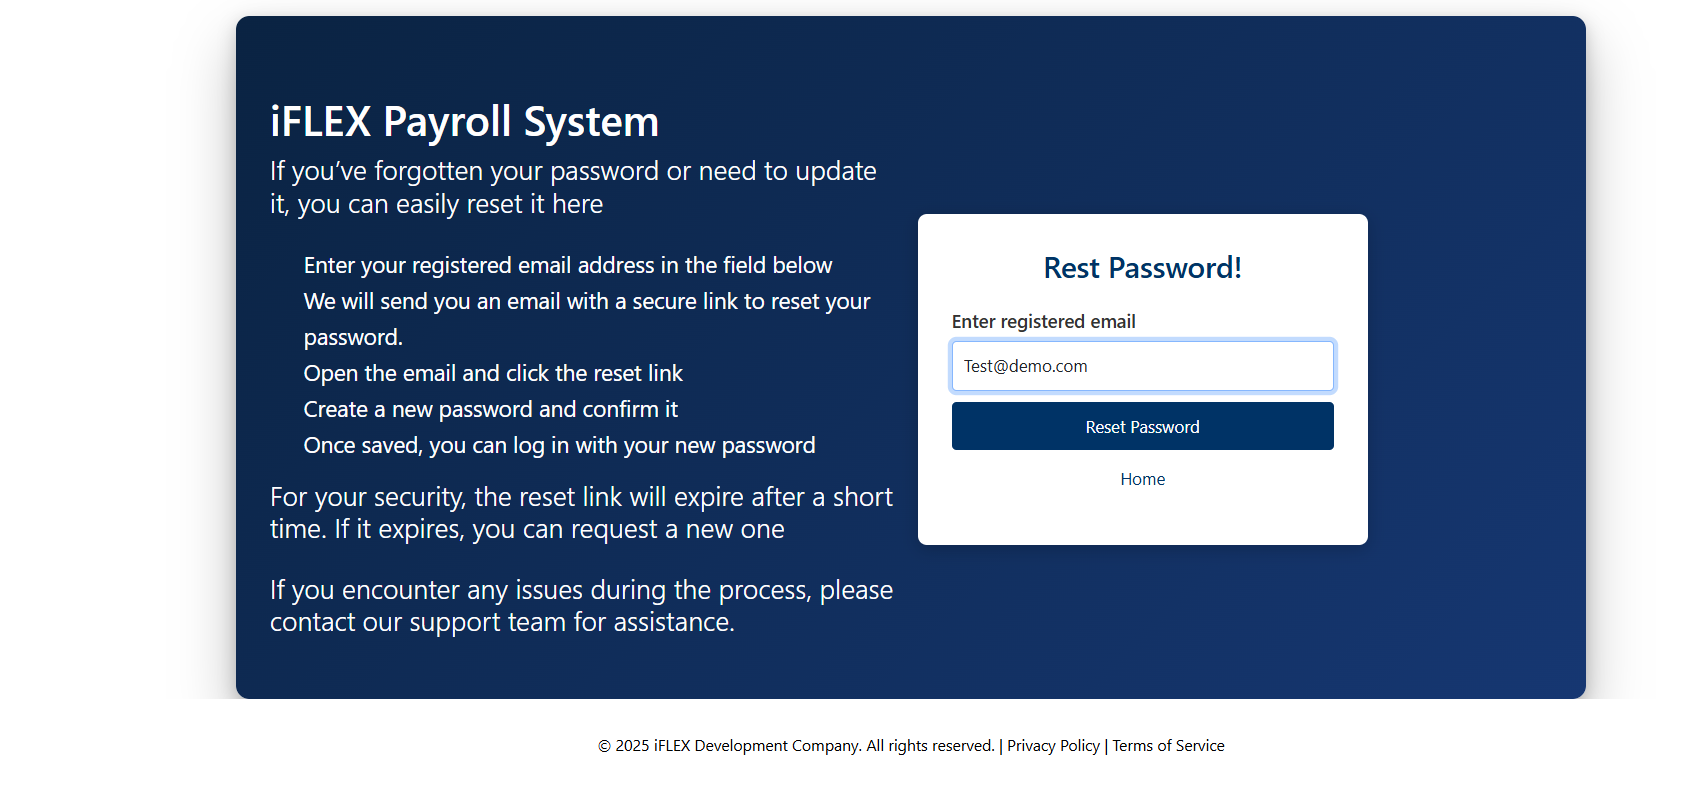
Step 3: Check your email for the temporary password
You will receive an email that contains a temporary password. Copy it—you will use it to log in.
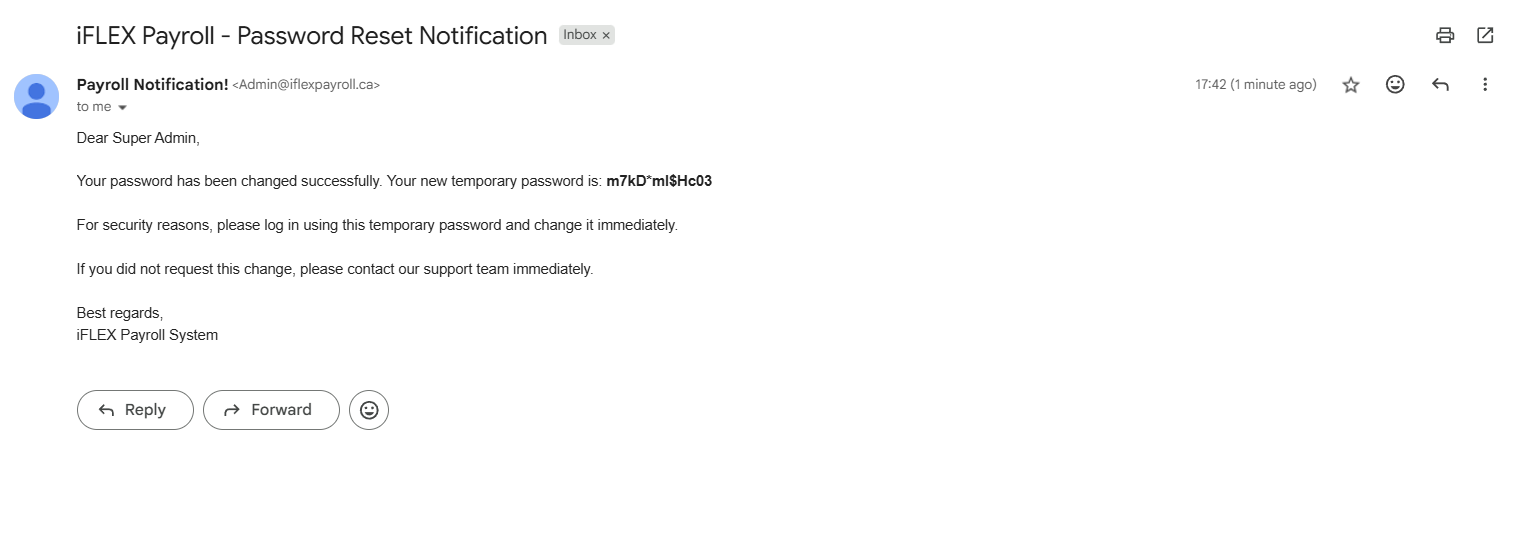
Step 4: Log in using your email + the temporary password
Go back to the login page and sign in using:
- Login Name: your email address
- Password: the temporary password from the email
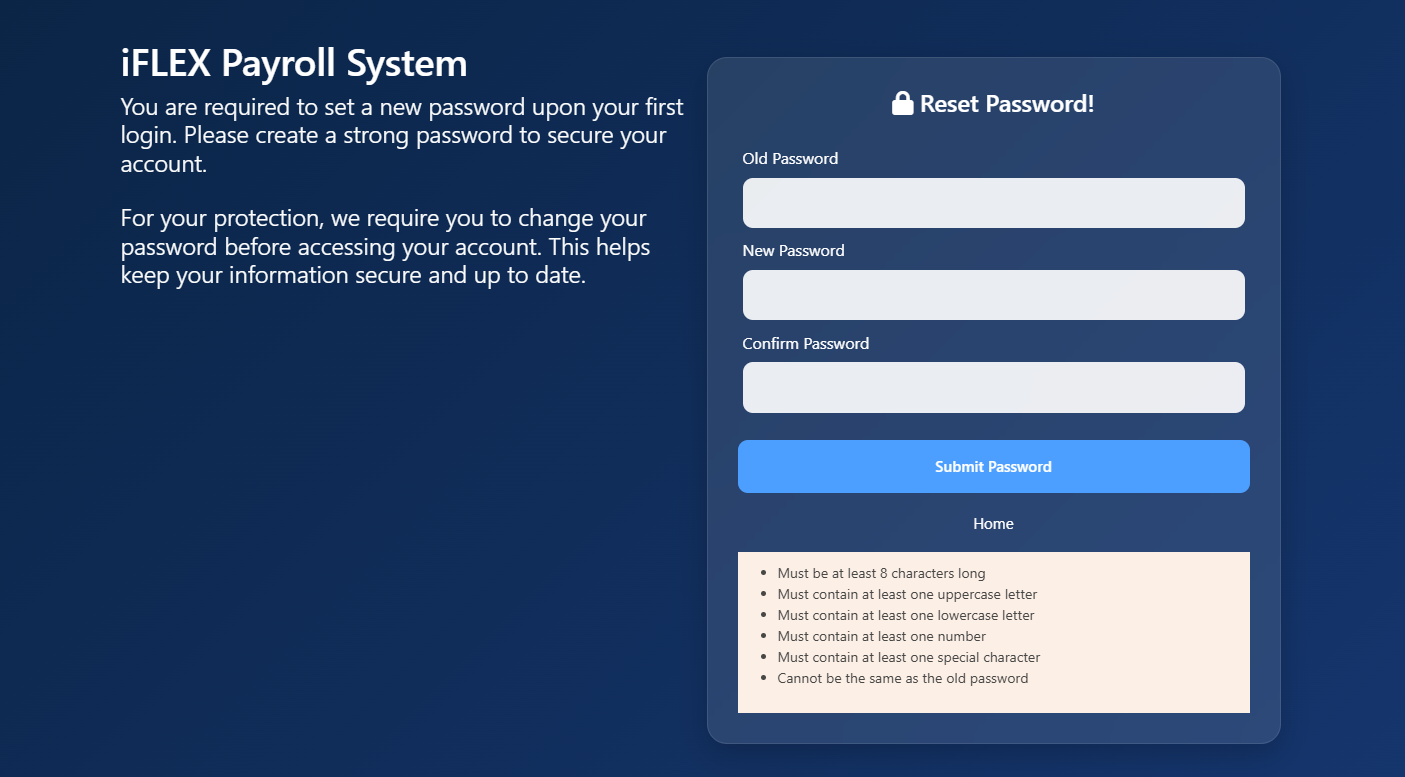
Step 5: Set your new password
After logging in with the temporary password, you will be prompted to create a new password. Enter:
- Old Password: the temporary password from your email
- New Password: your new password
- Confirm Password: re-enter your new password
Click Submit Password to save your new password.
You can also change your password at any time after logging in. From the left‑hand menu, click Change Password, then enter your old password and your new password to update it.
Employees
This page explains how to manage employees in iFlex Payroll: add them to the list, edit their details (including income rules, deductions, etc.), and delete employees when needed.
Part 1: Add employees to the list
After logging in, you will land on the company dashboard. To manage employees, click Employees from the left-side menu.
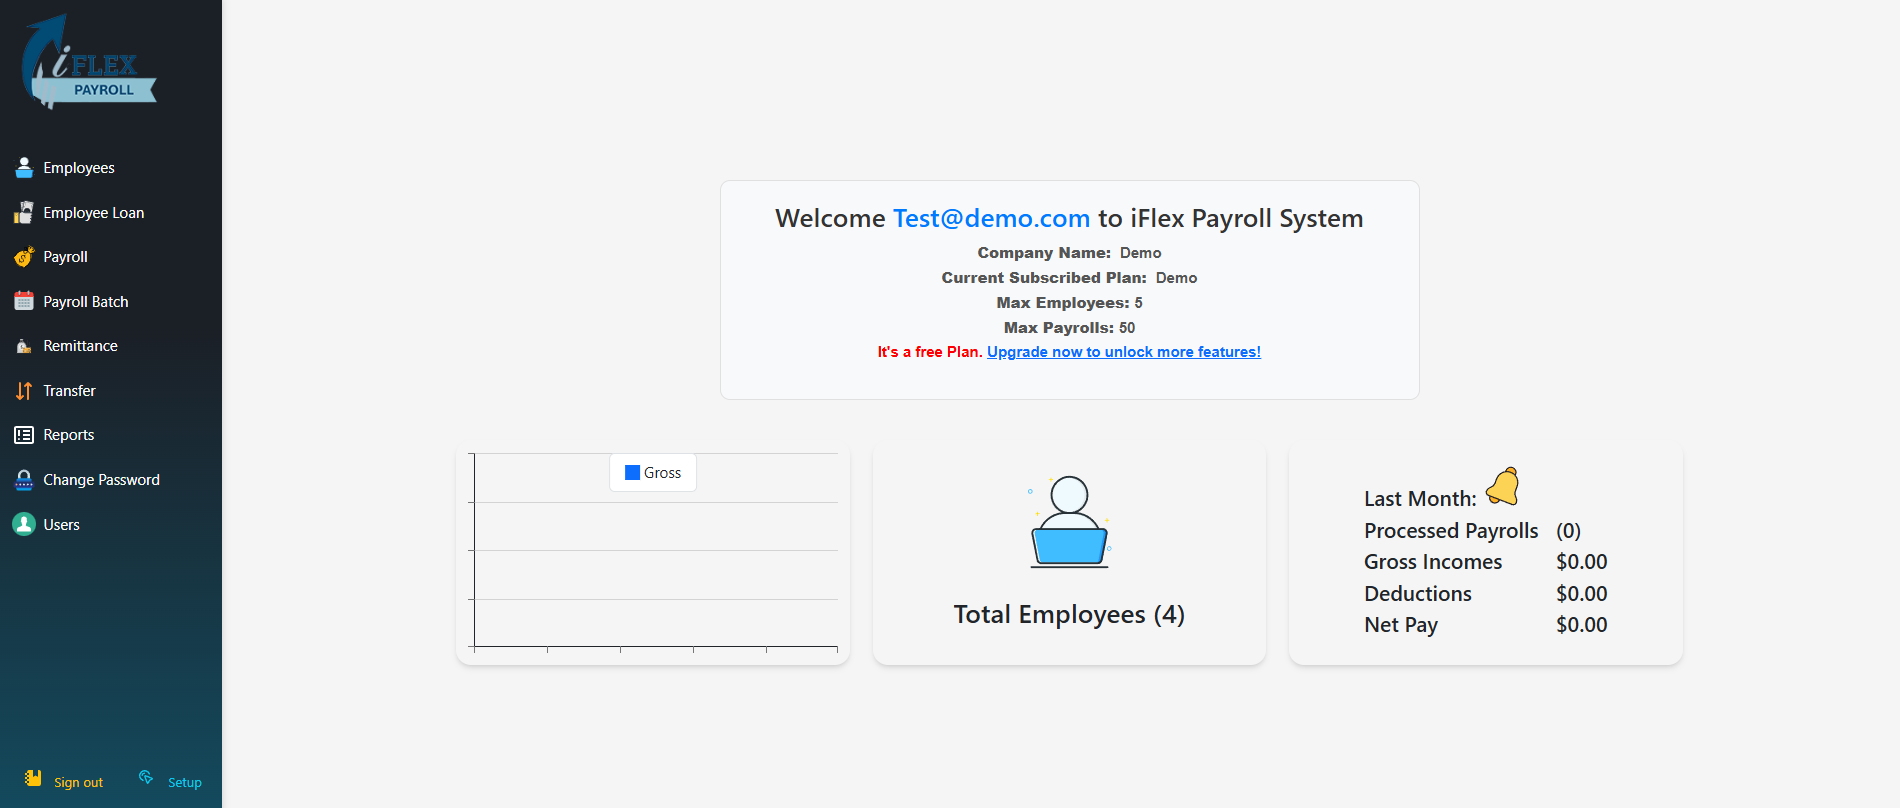
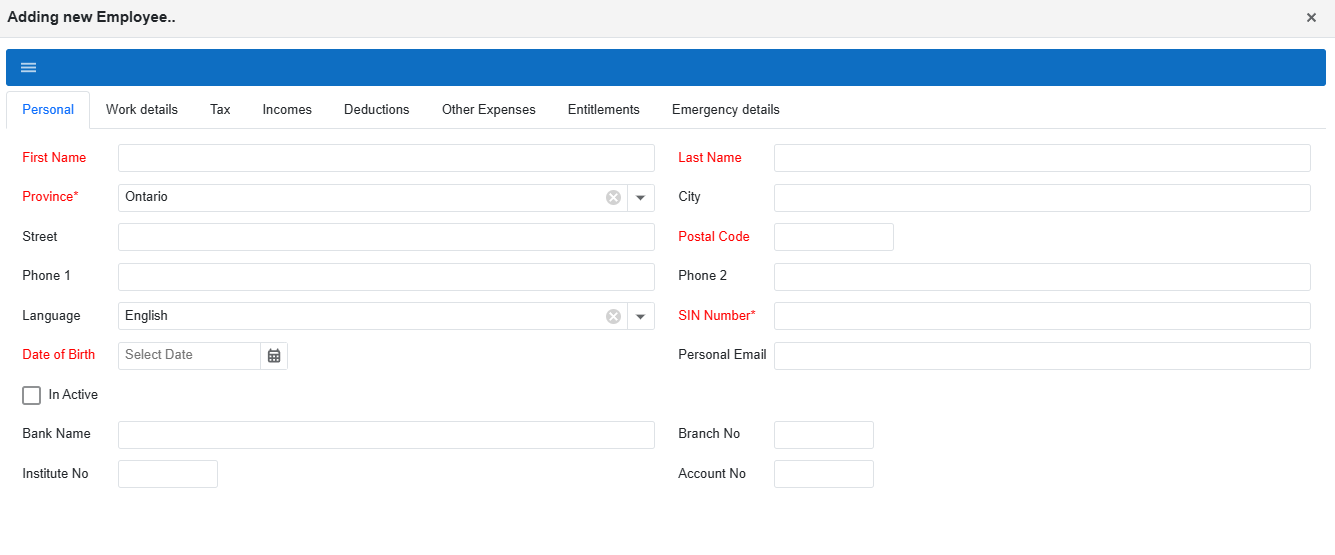
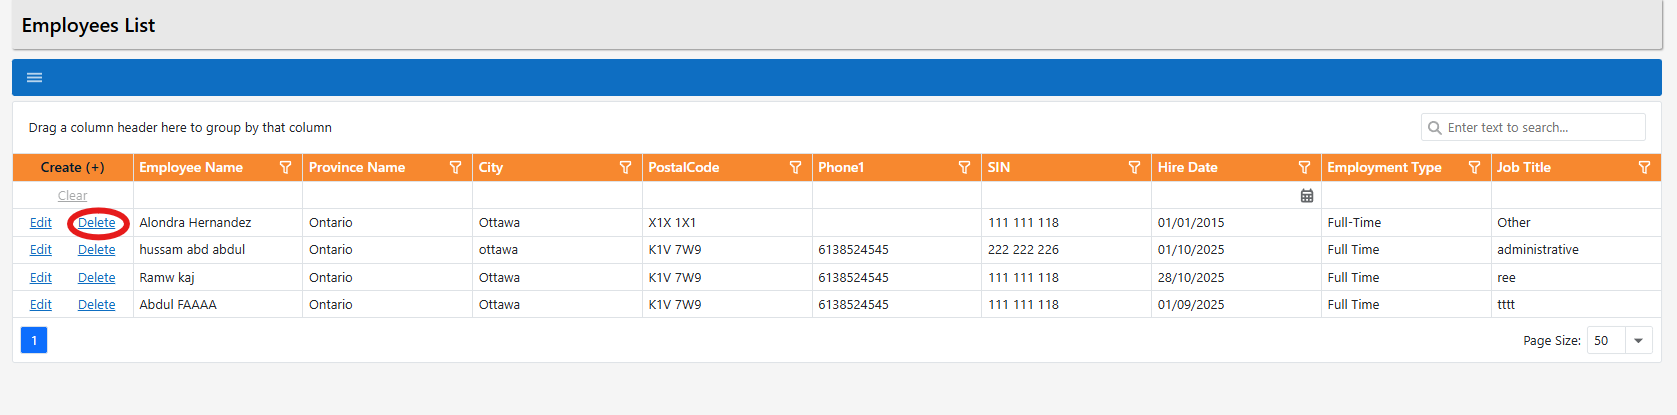
You will be taken to the Employees List screen, which shows all employees currently added to your company.
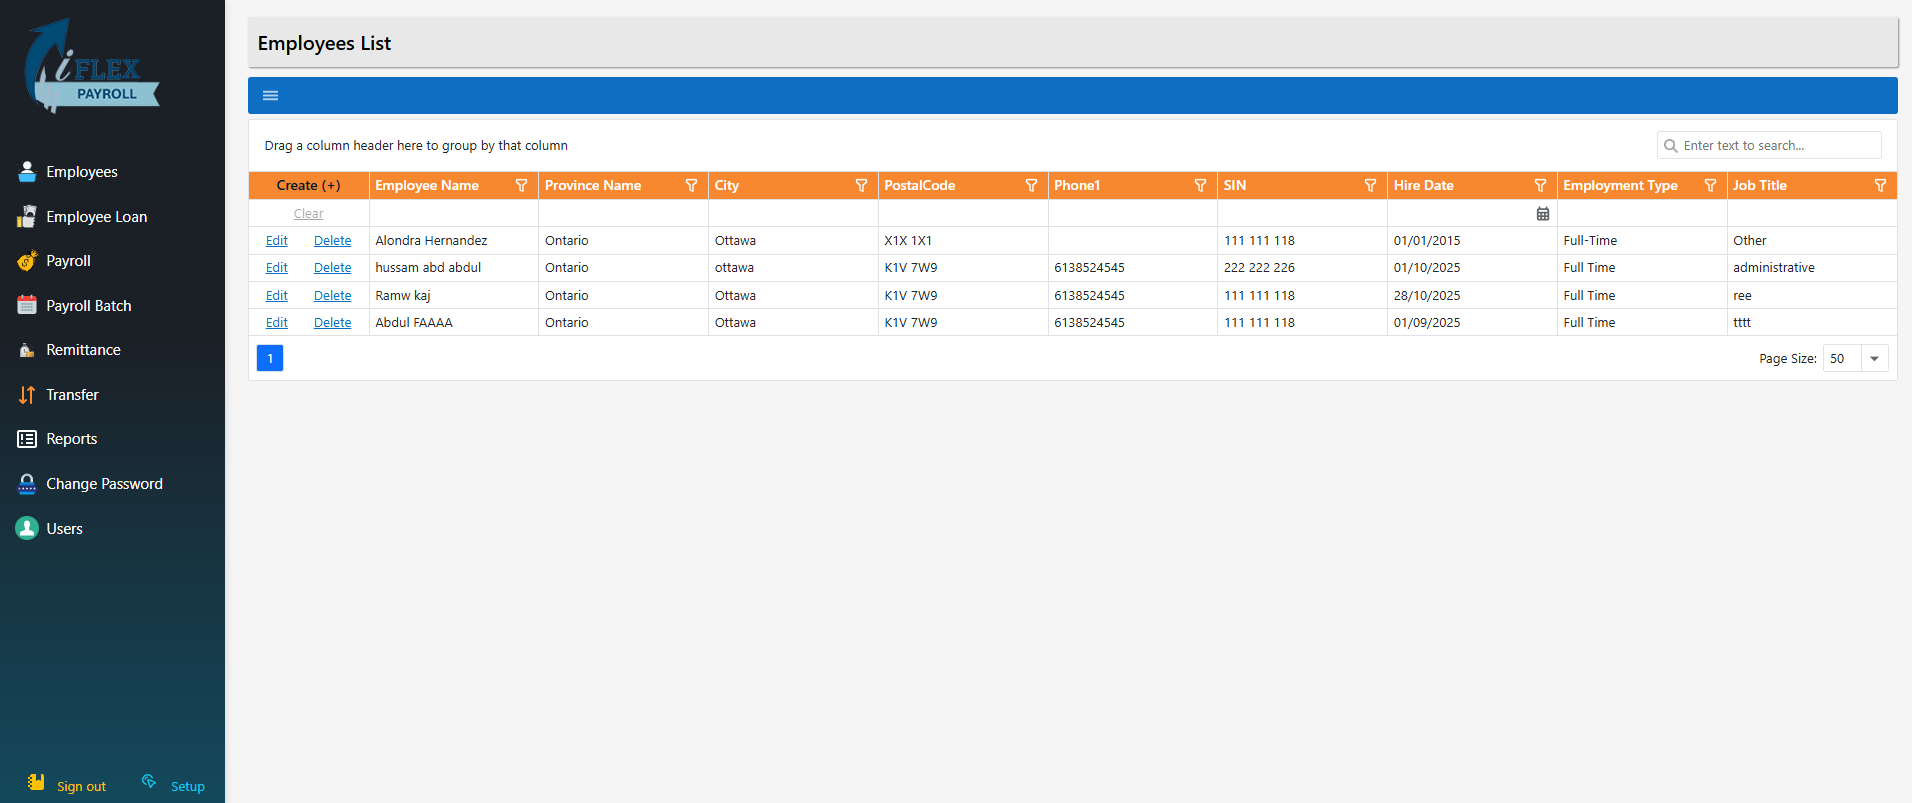
To add a new employee, click the Create (+) button at the top of the list.
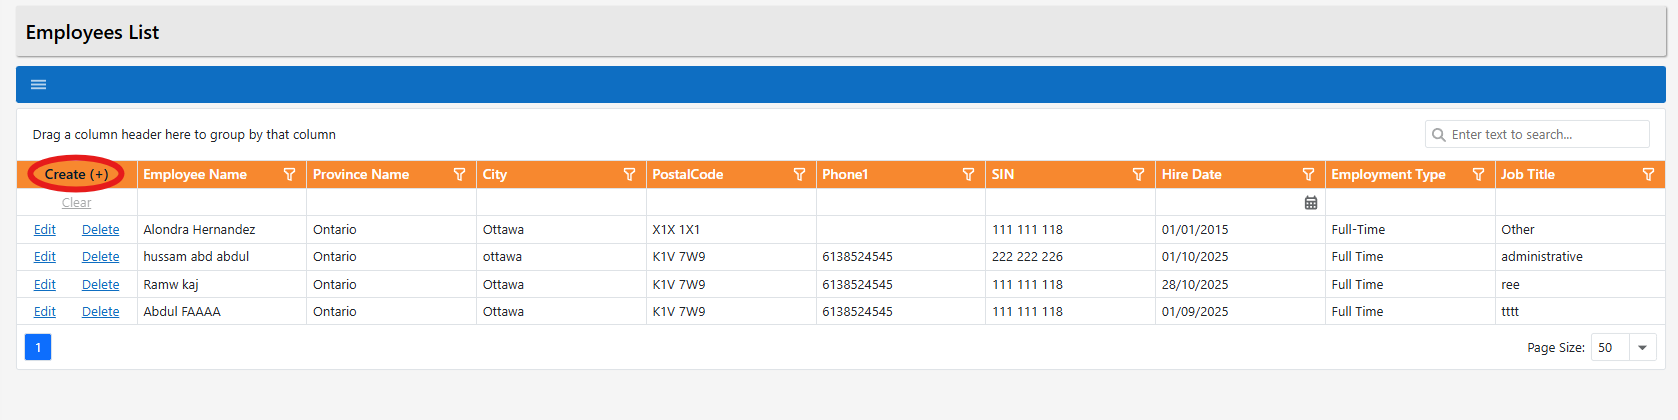
The Adding New Employee popup will appear. This screen uses the same tabs and fields as the Edit Employee popup.
Part 2: Edit employee information
To edit an employee, click Edit beside the employee name. This opens the Editing Employee popup.
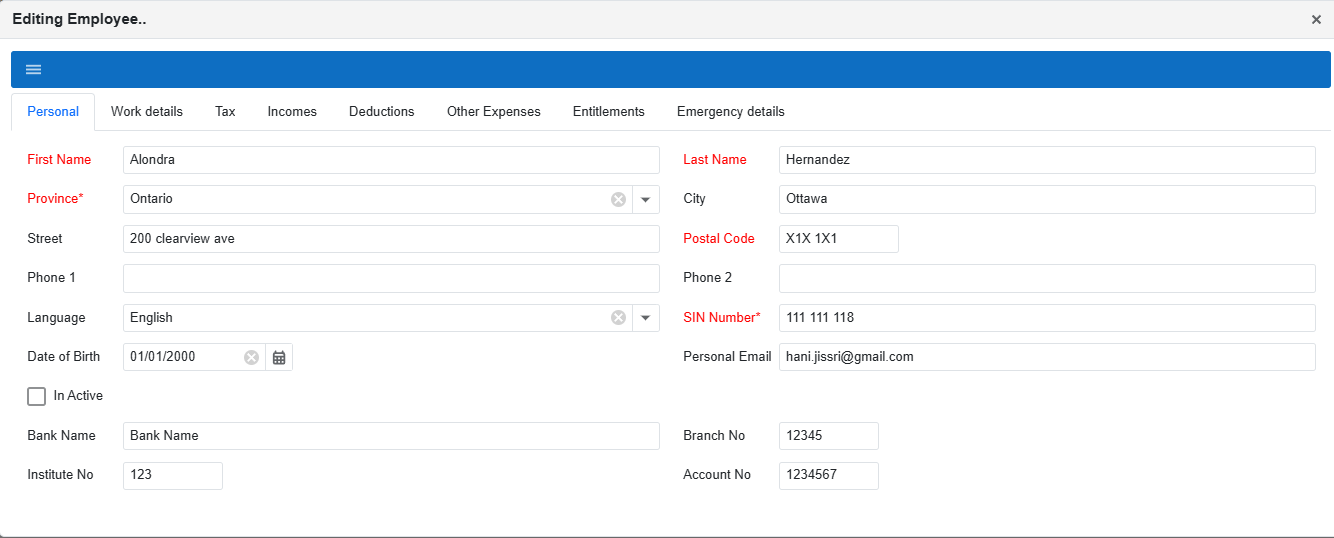
Editing Employee: Personal tab
The Personal tab contains the employee’s personal details (name, province/city, postal code, SIN, date of birth, contact details, banking info, etc.). Update these fields when employee information changes.
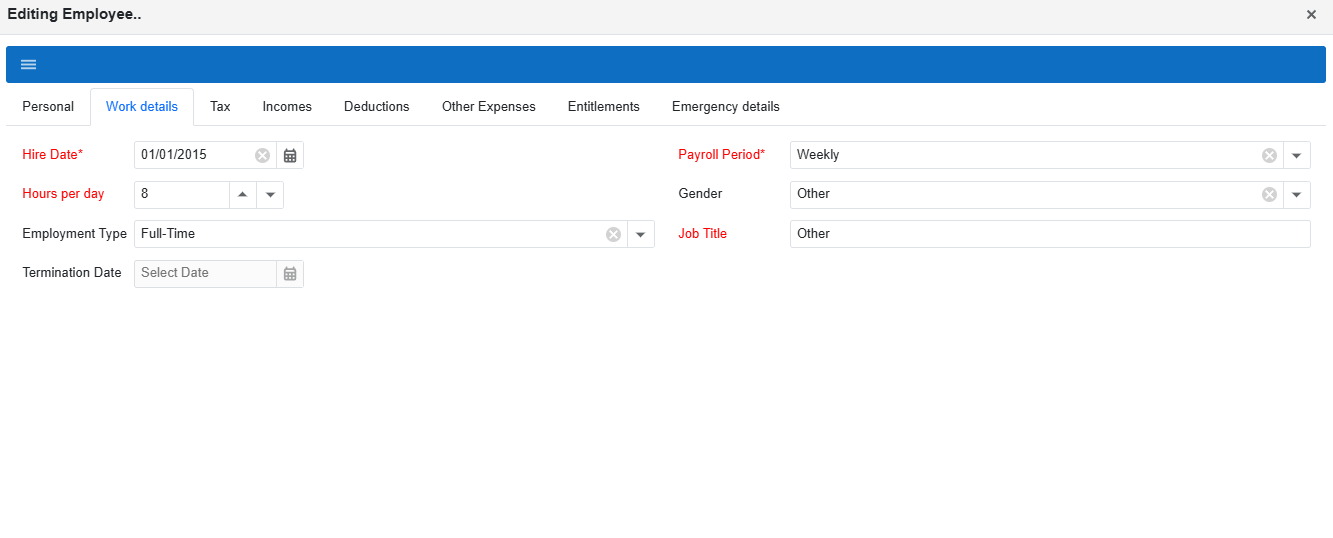
Editing Employee: Work details tab
The Work details tab is for job-related settings such as Hire Date, Payroll Period, Hours per day, Employment Type, and Job Title.
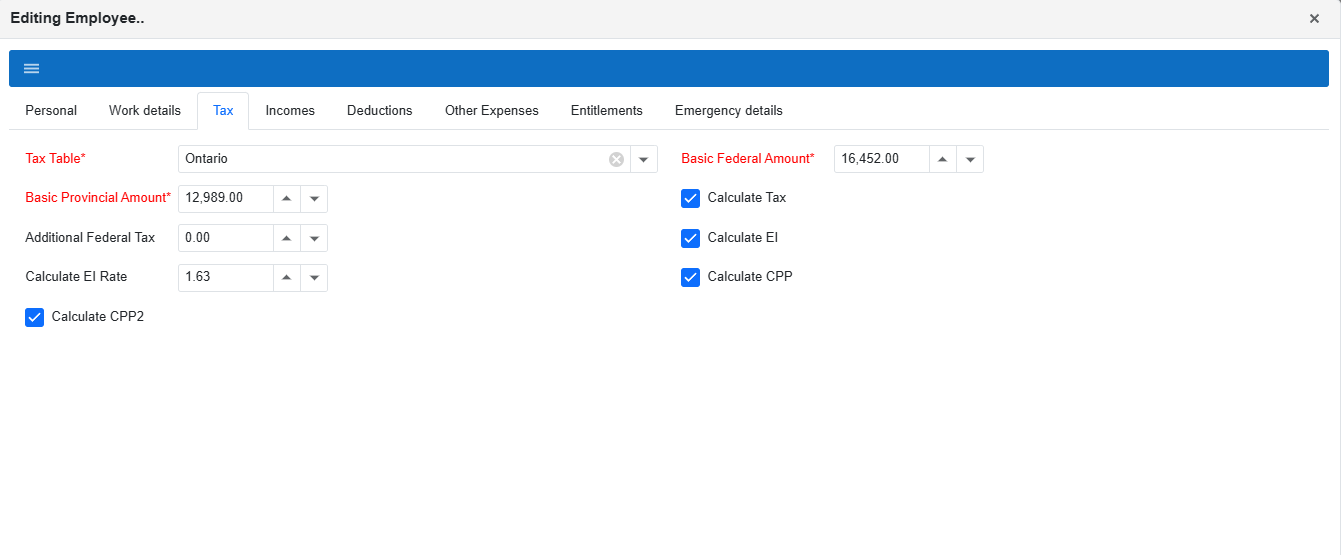
Editing Employee: Tax tab (use only if you know what you are changing)
The Tax tab is usually the same for most employees. Only change it if you understand what the settings do. You can change the employee’s province (tax table), and enable/disable items like CPP and EI.
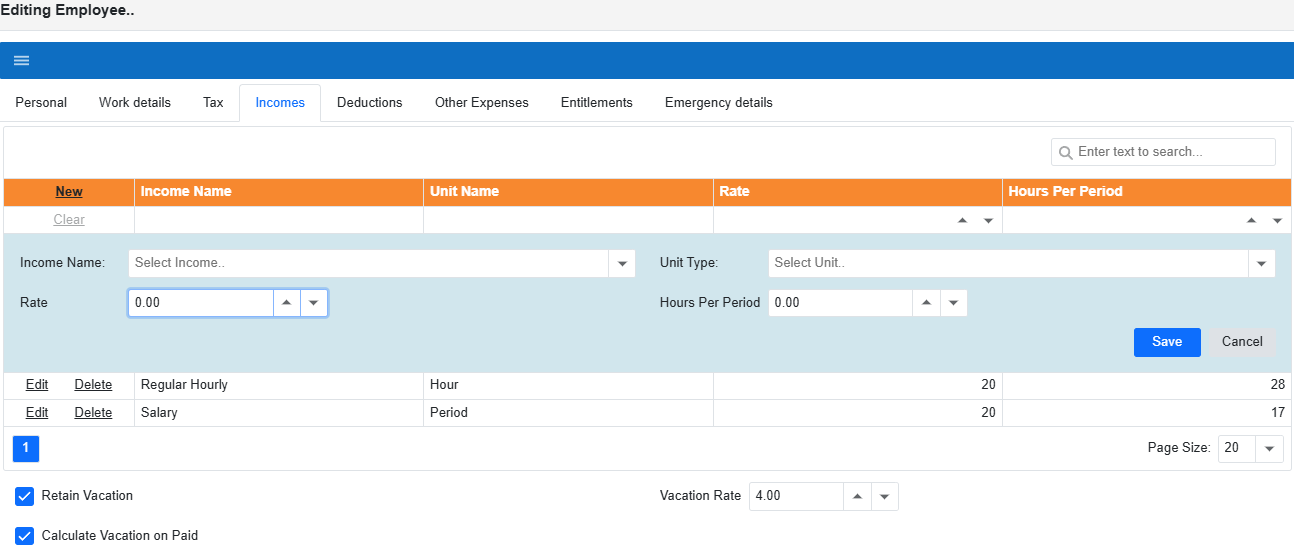
Editing Employee: Incomes tab
The Incomes tab is where you manage the employee’s income lines (hourly, salary, etc.). You can add new income lines, edit existing ones, and remove ones you no longer need. Vacation settings are also available here.
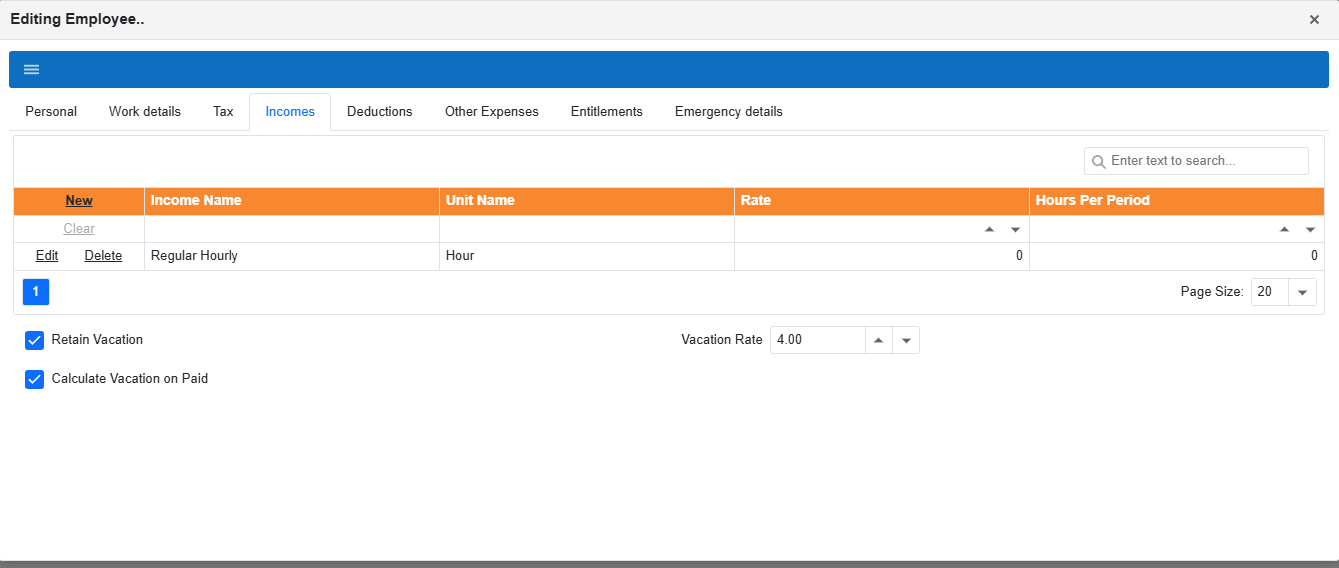
Add a new income line
Click New, choose the income type and unit, enter the Rate and Hours Per Period, then click Save.
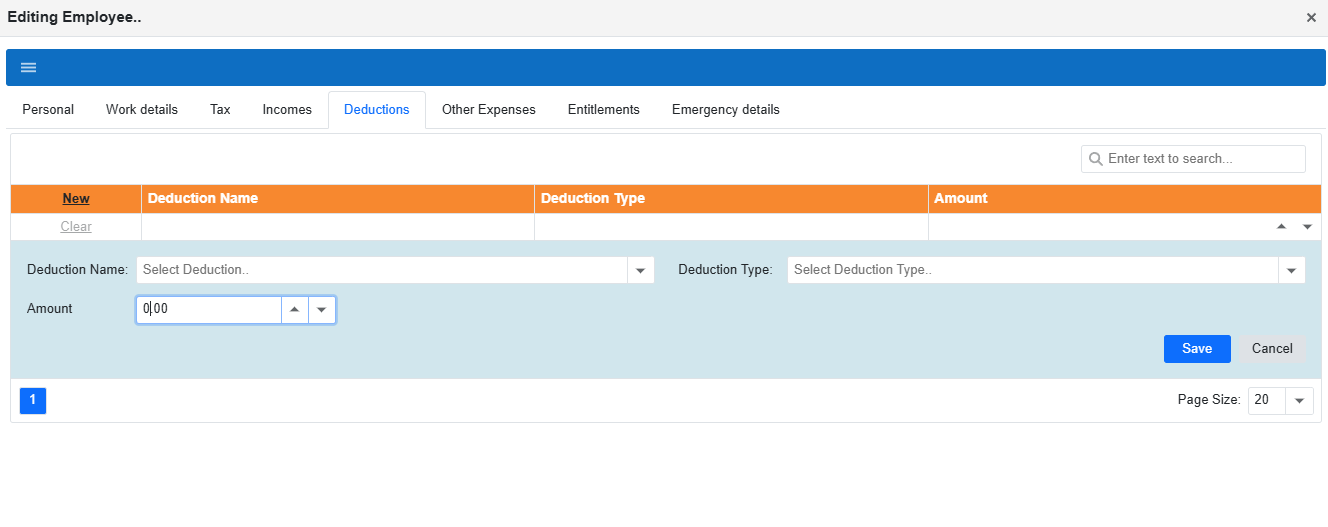
Editing Employee: Deductions tab
The Deductions tab is used for employee deductions (for example: union dues, medical deductions, and other company-specific deductions).
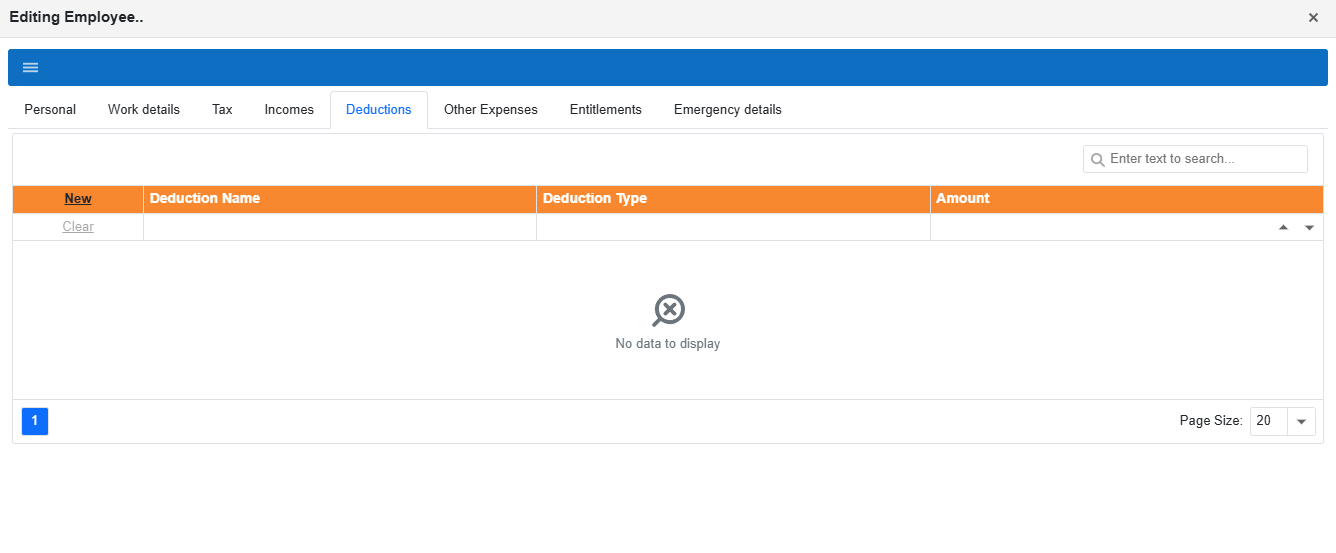
To add a deduction, click New, select the deduction name/type, enter the amount, then click Save.
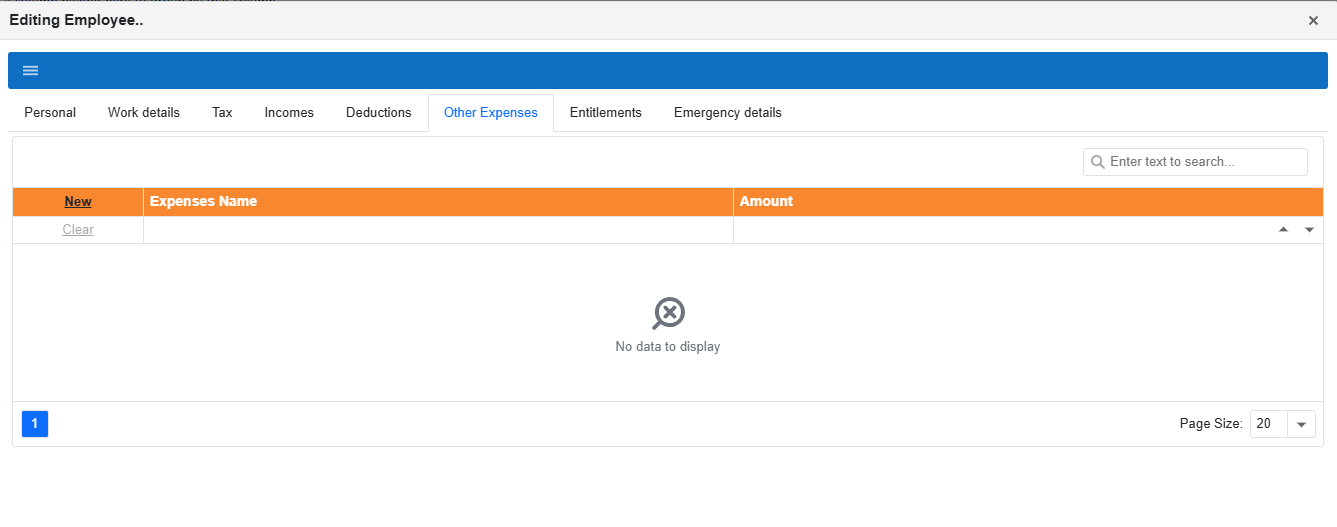
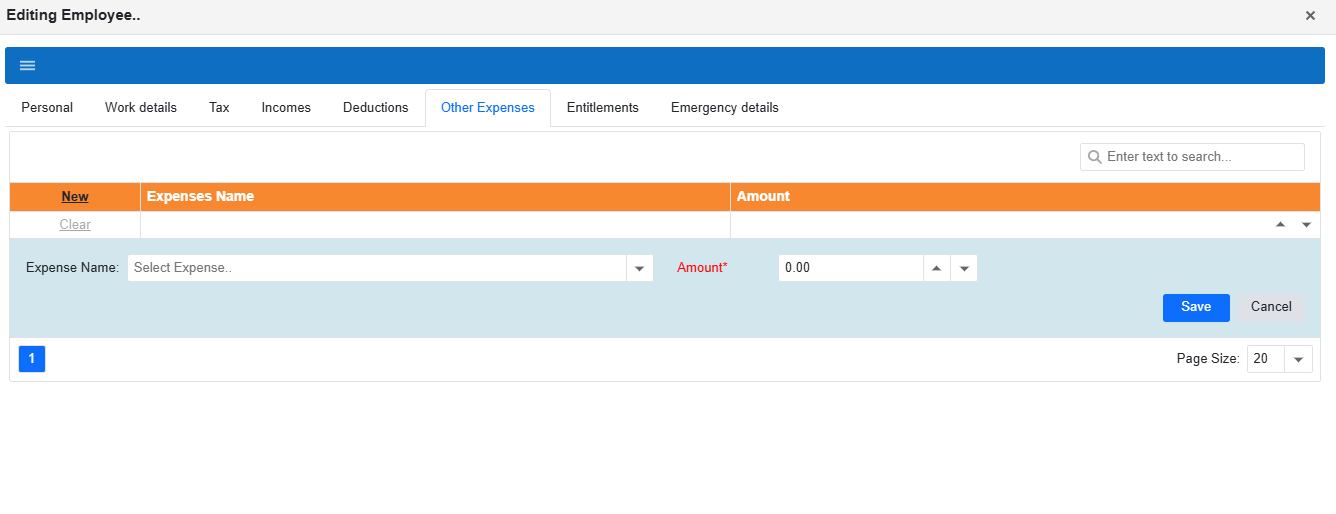
Editing Employee: Other Expenses tab
The Other Expenses tab is for other employee-related expenses (for example: RRSP, donations, etc.). To add an expense, click New, choose the expense type, enter the amount, then click Save.
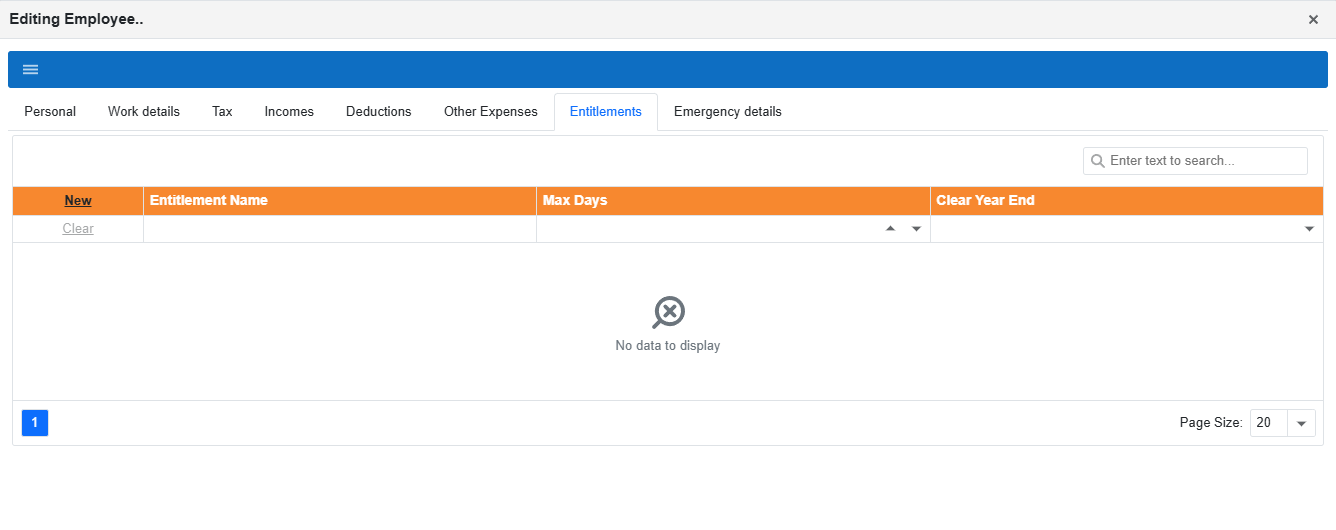
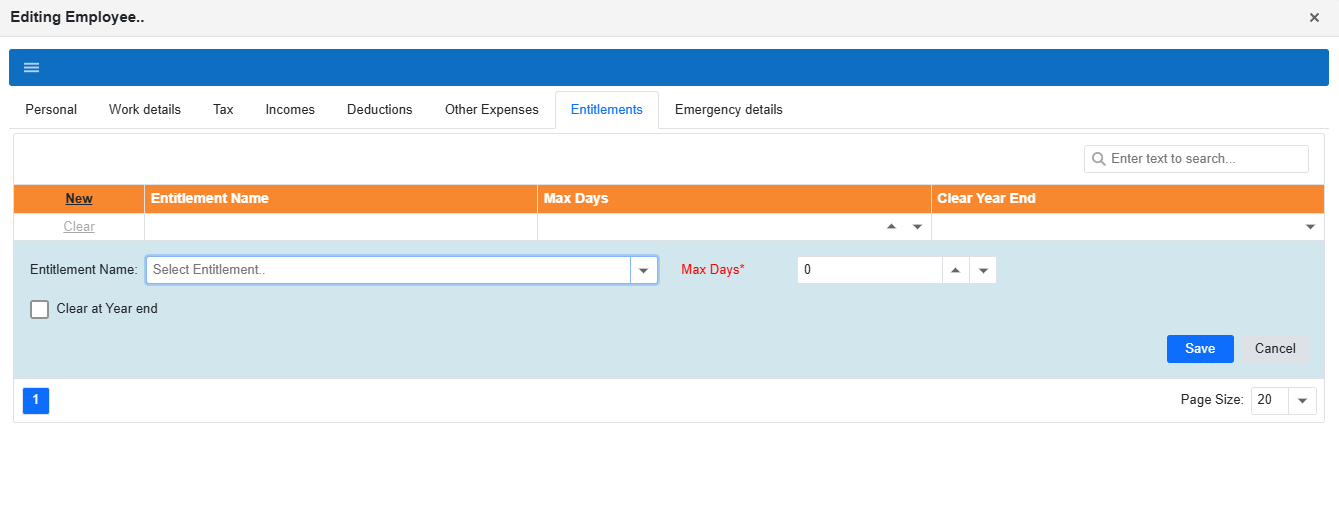
Editing Employee: Entitlements tab
The Entitlements tab is where you manage entitlements like sick days, holidays, travel days, and other entitlement types. To add an entitlement, click New, fill the details, then click Save.
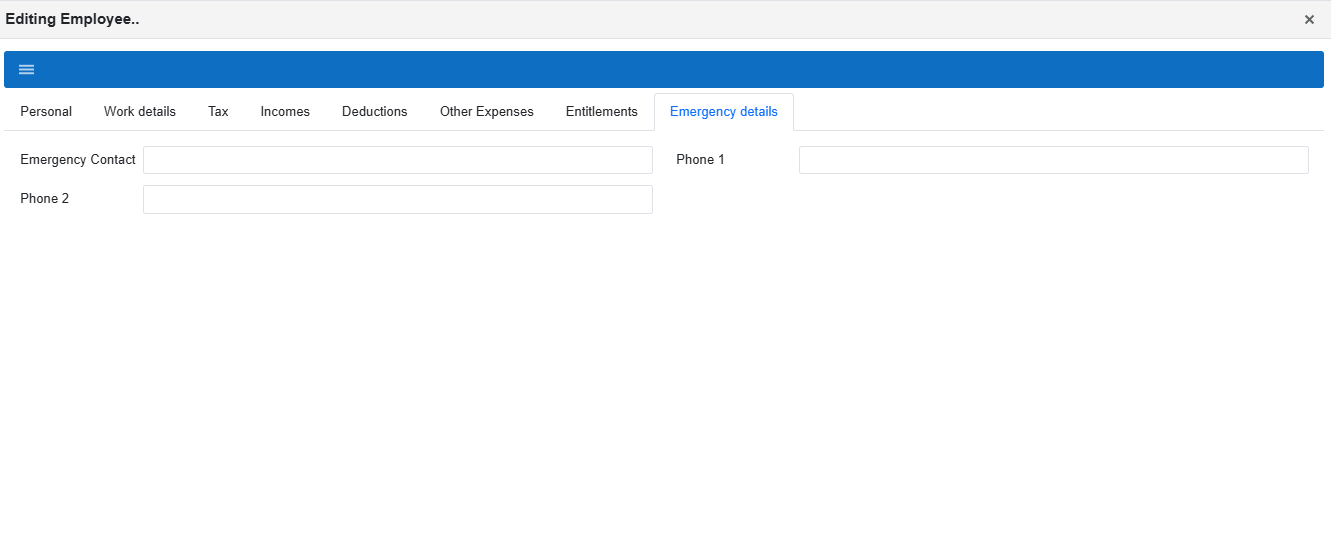
Editing Employee: Emergency details tab (optional)
The Emergency details tab is optional. Use it to store emergency contact information for the employee.
Part 3: Delete employees
To remove an employee, click Delete beside the employee’s name. Use this carefully—removing an employee may affect historical records depending on your company policy.
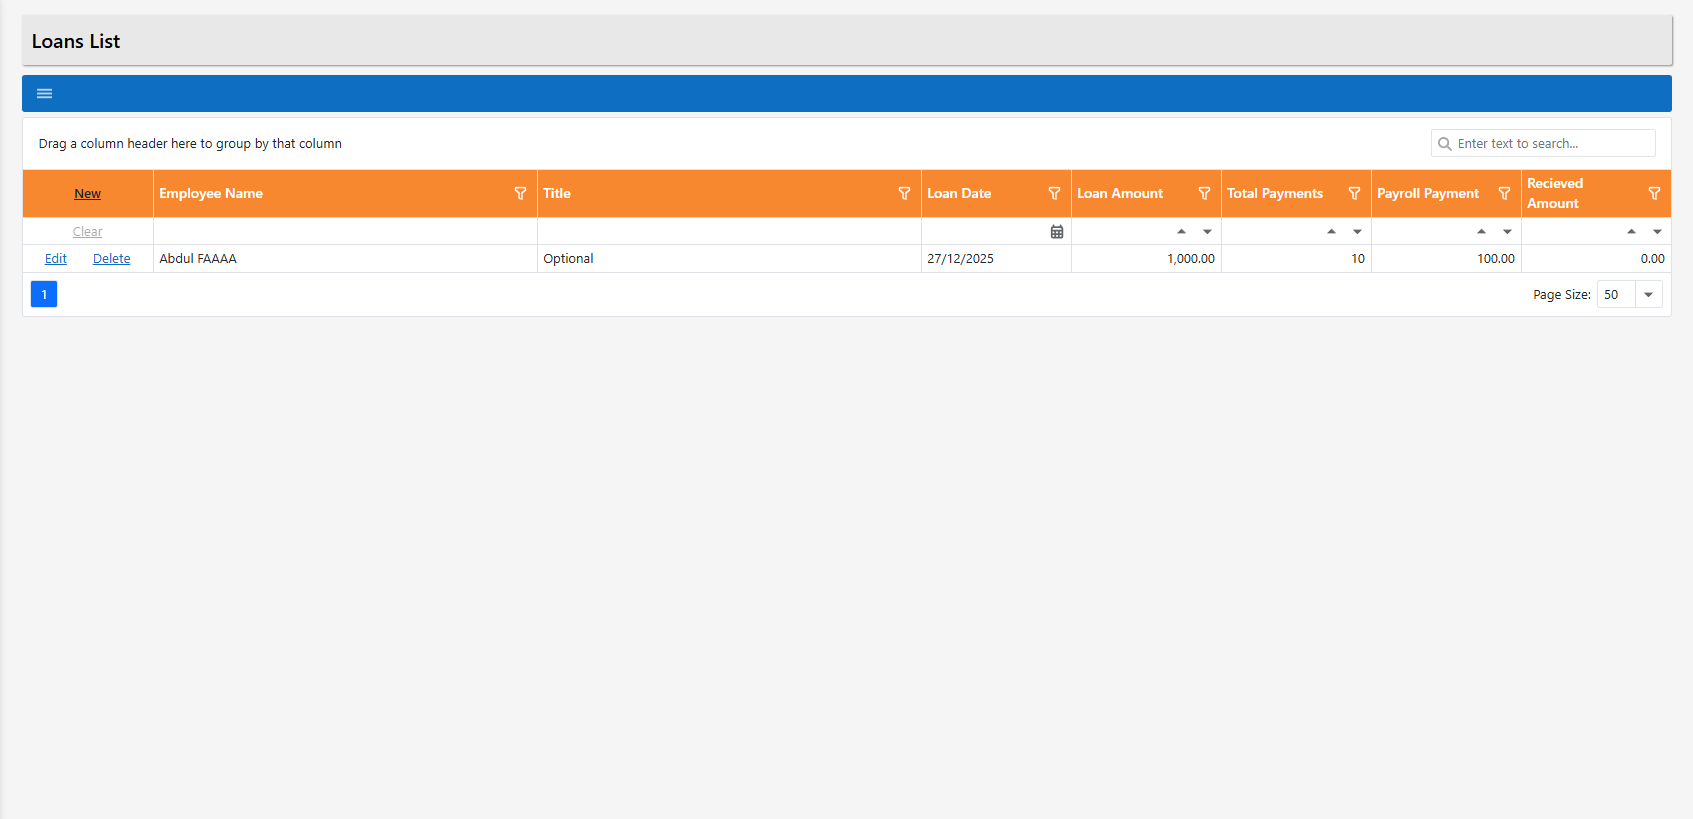
Employee Loan
This page shows all employee loans in your company. You can add a new loan, edit an existing loan, or delete a loan when needed.
Part 1: Add an employee loan
Open Employee Loan from the left menu. You will see the Loans List page where all employee loans are listed.

To add a new loan, click New at the top of the grid.
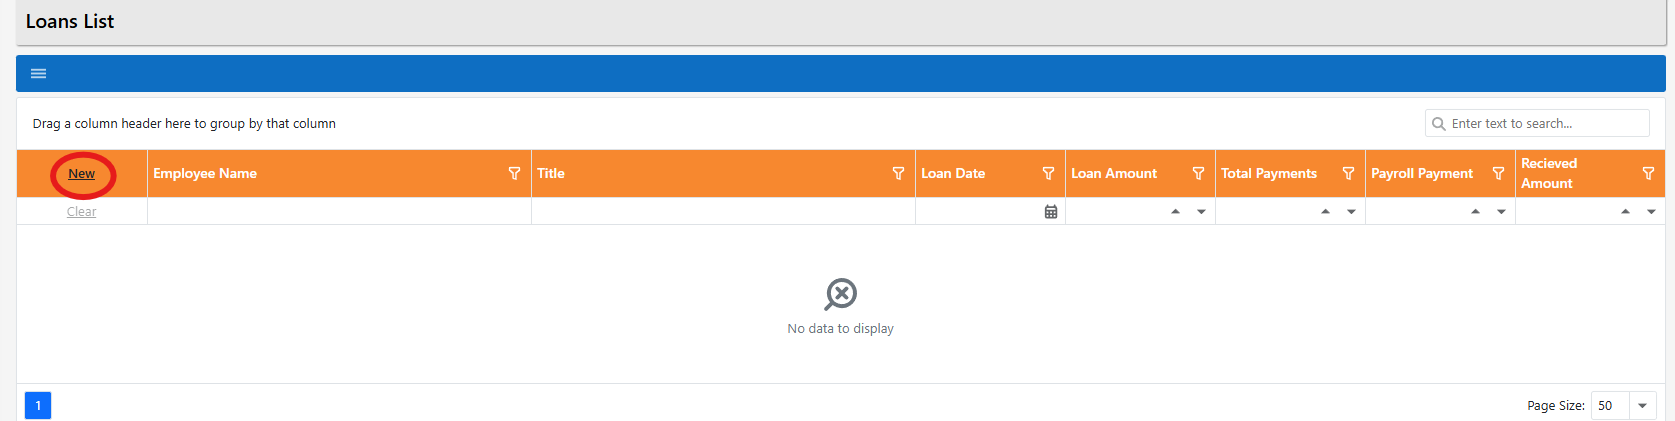
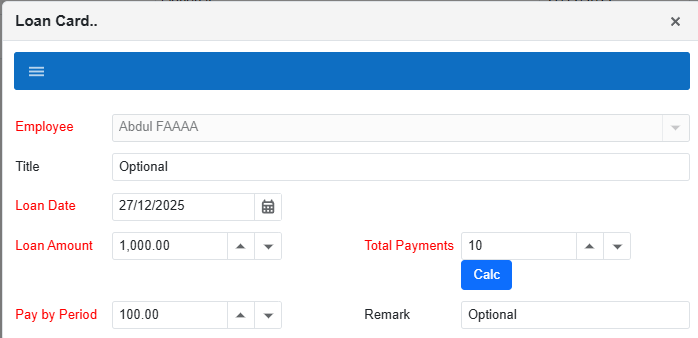
The Loan Card popup will appear. Fill out the loan details:
- Employee: select the employee taking the loan
- Loan Date: date the loan was given
- Loan Amount: total loan amount
- Total Payments: number of payments the employee will make
- Click Calc to calculate the payment amount per period
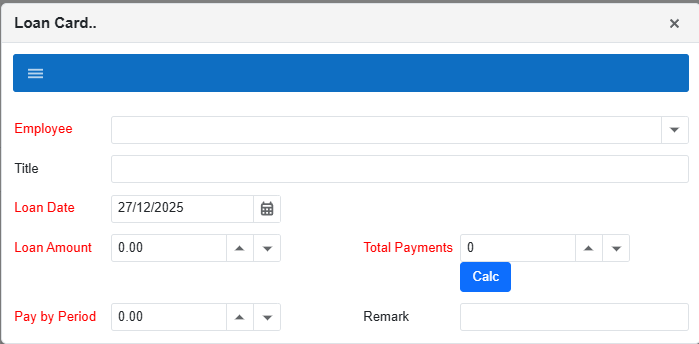
After you enter the values, click Calc. The system will calculate the amount that will be deducted each pay period.
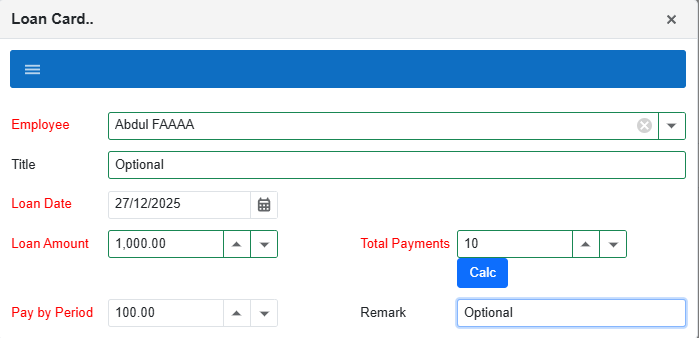
To save the loan, click the menu (☰) icon inside the Loan Card popup, then click Save.

After saving, the loan will appear in the Loans List.
Part 2: Edit an employee loan
To edit a loan, click Edit beside the loan record.
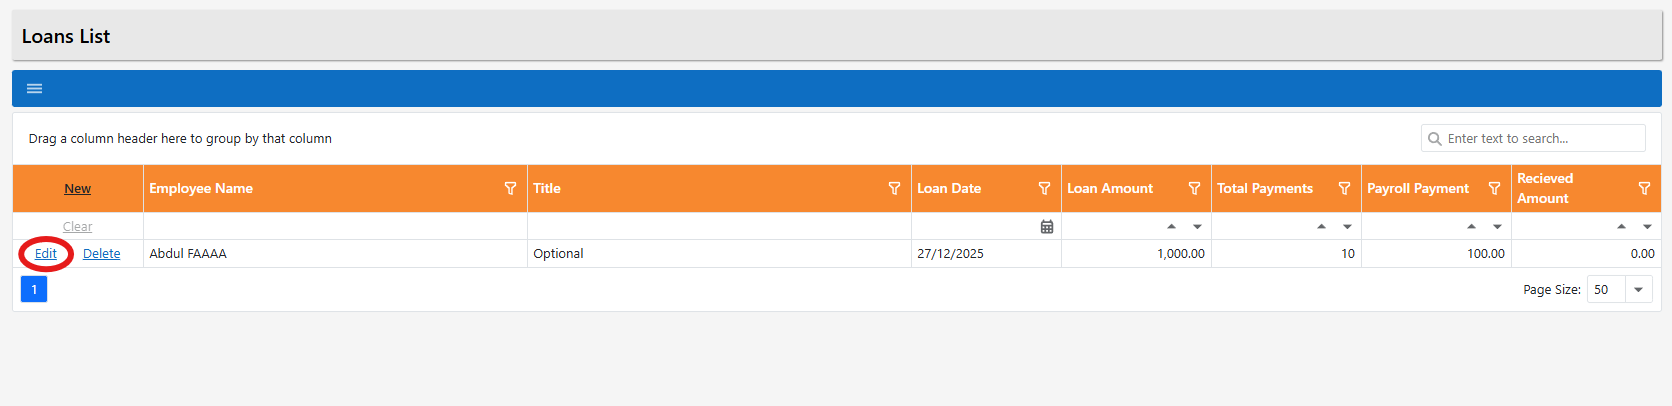
The Loan Card popup will appear with the existing information. Editing is the same process as adding: update the fields, click Calc if needed, then use the menu (☰) and Save.
Part 3: Delete an employee loan
To remove a loan, click Delete beside the loan record.
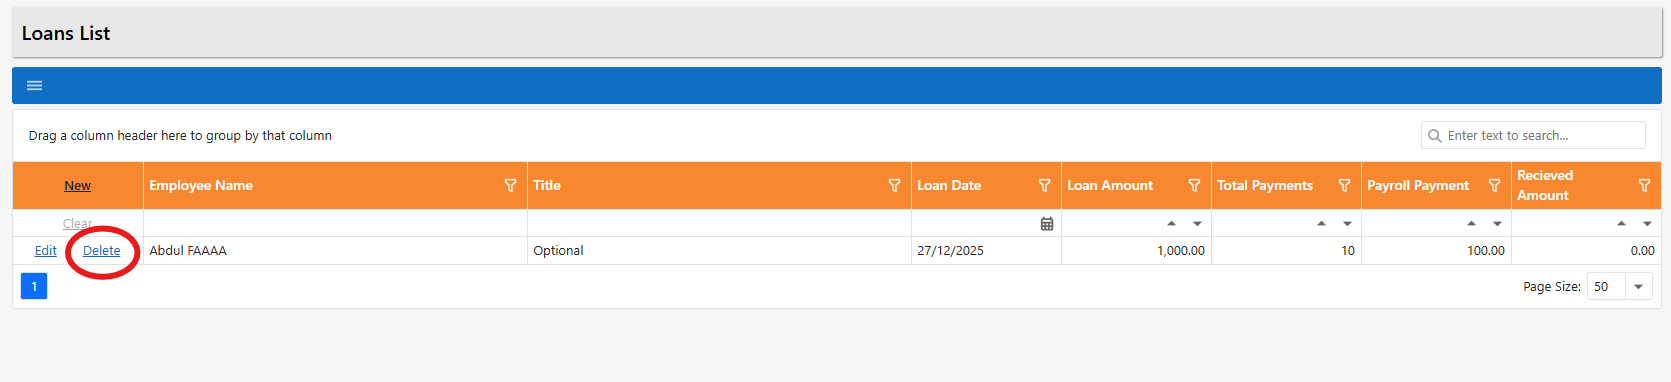
Confirm the deletion by clicking Yes.

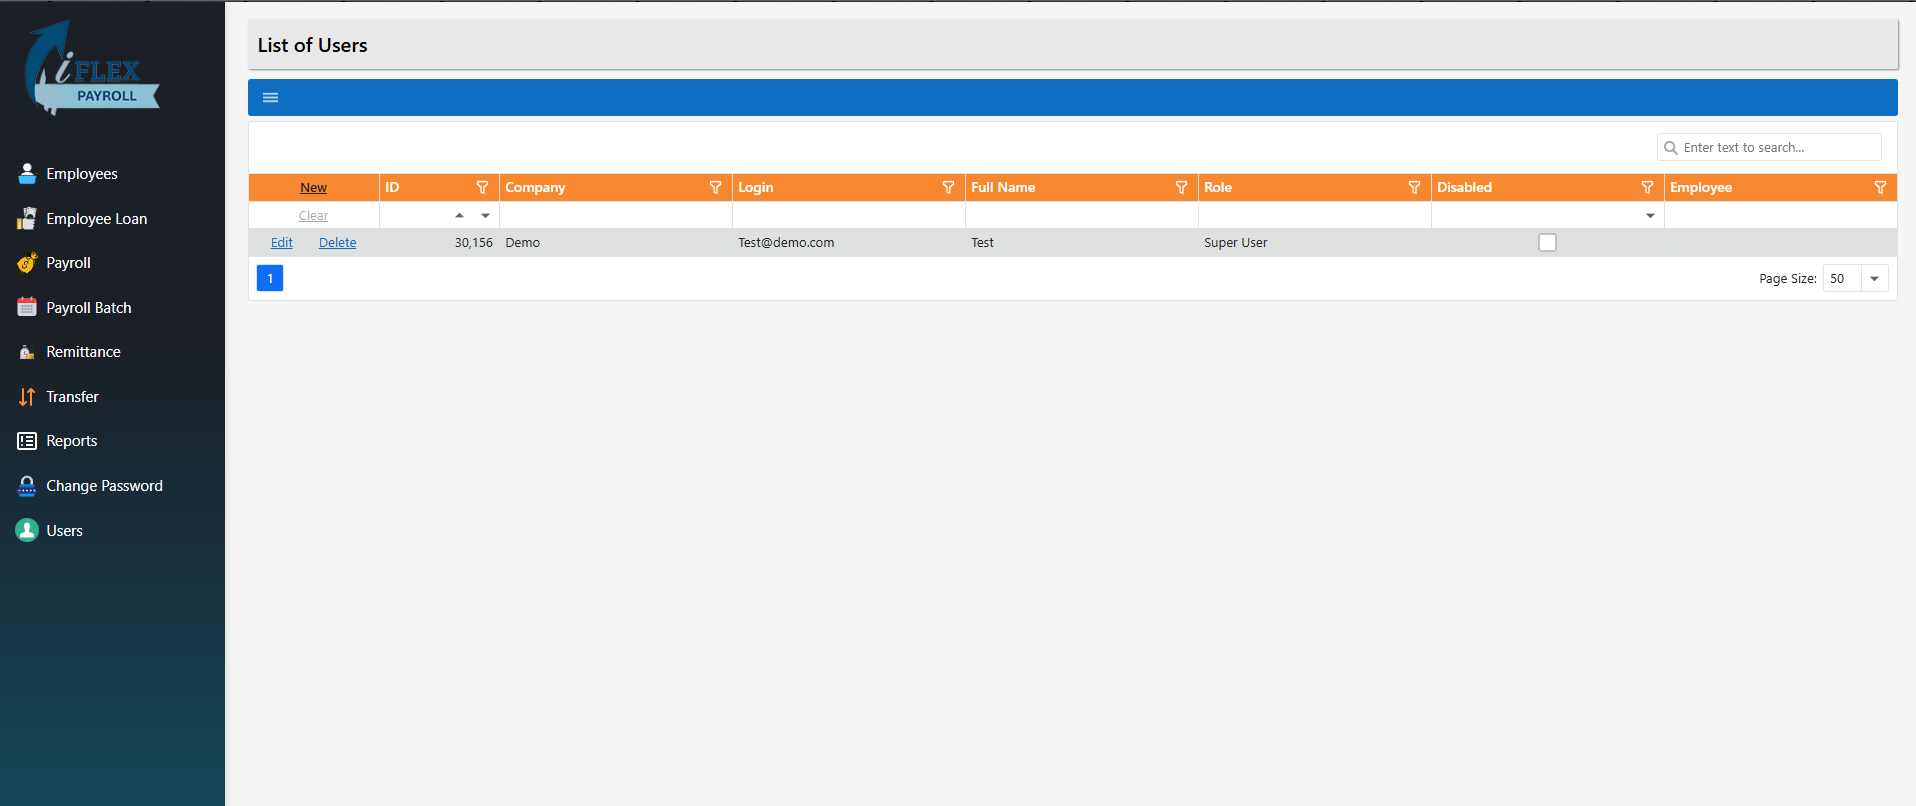
Users & Permissions
This page shows everyone who has access to your company’s iFlex Payroll system. You can see system users (admins/staff) and employee users (employees who can log in to view their own information such as ROE and previous payments).
Step 1: Open the Users page
From the left-side menu, click Users. You will be taken to the List of Users page.
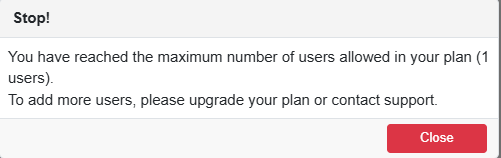
Step 2: Try to add a new user
To add a new user, click New at the top of the grid.

Step 3: Trial limitation message
If your company is still on the free trial, you may see a message that you reached the maximum number of users. Once your subscription starts, you will be able to add, edit, and remove users.
Payroll
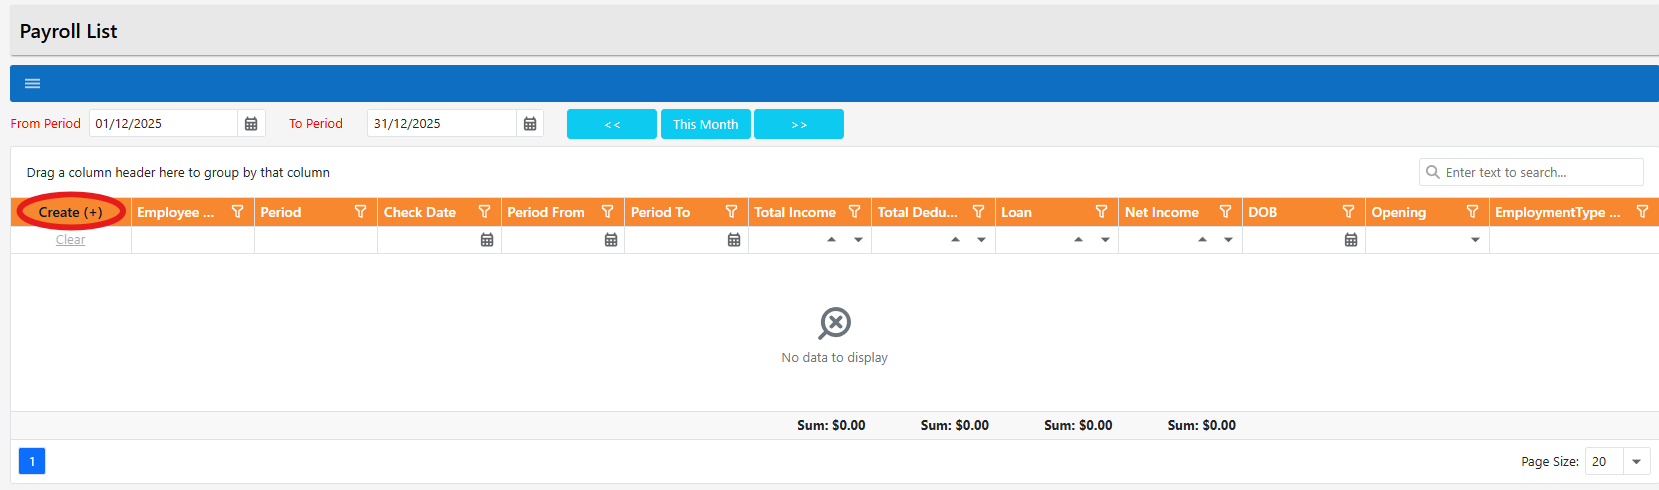
The Payroll page is where you create and manage payroll records for employees. You can filter by a specific pay period (or month), then create, edit, delete, and review payroll entries.
Step 1: Open Payroll
From the left-side menu, click Payroll. You will land on the Payroll List page. This grid shows payroll records (per employee and per period) and lets you create, edit, or delete payroll entries.
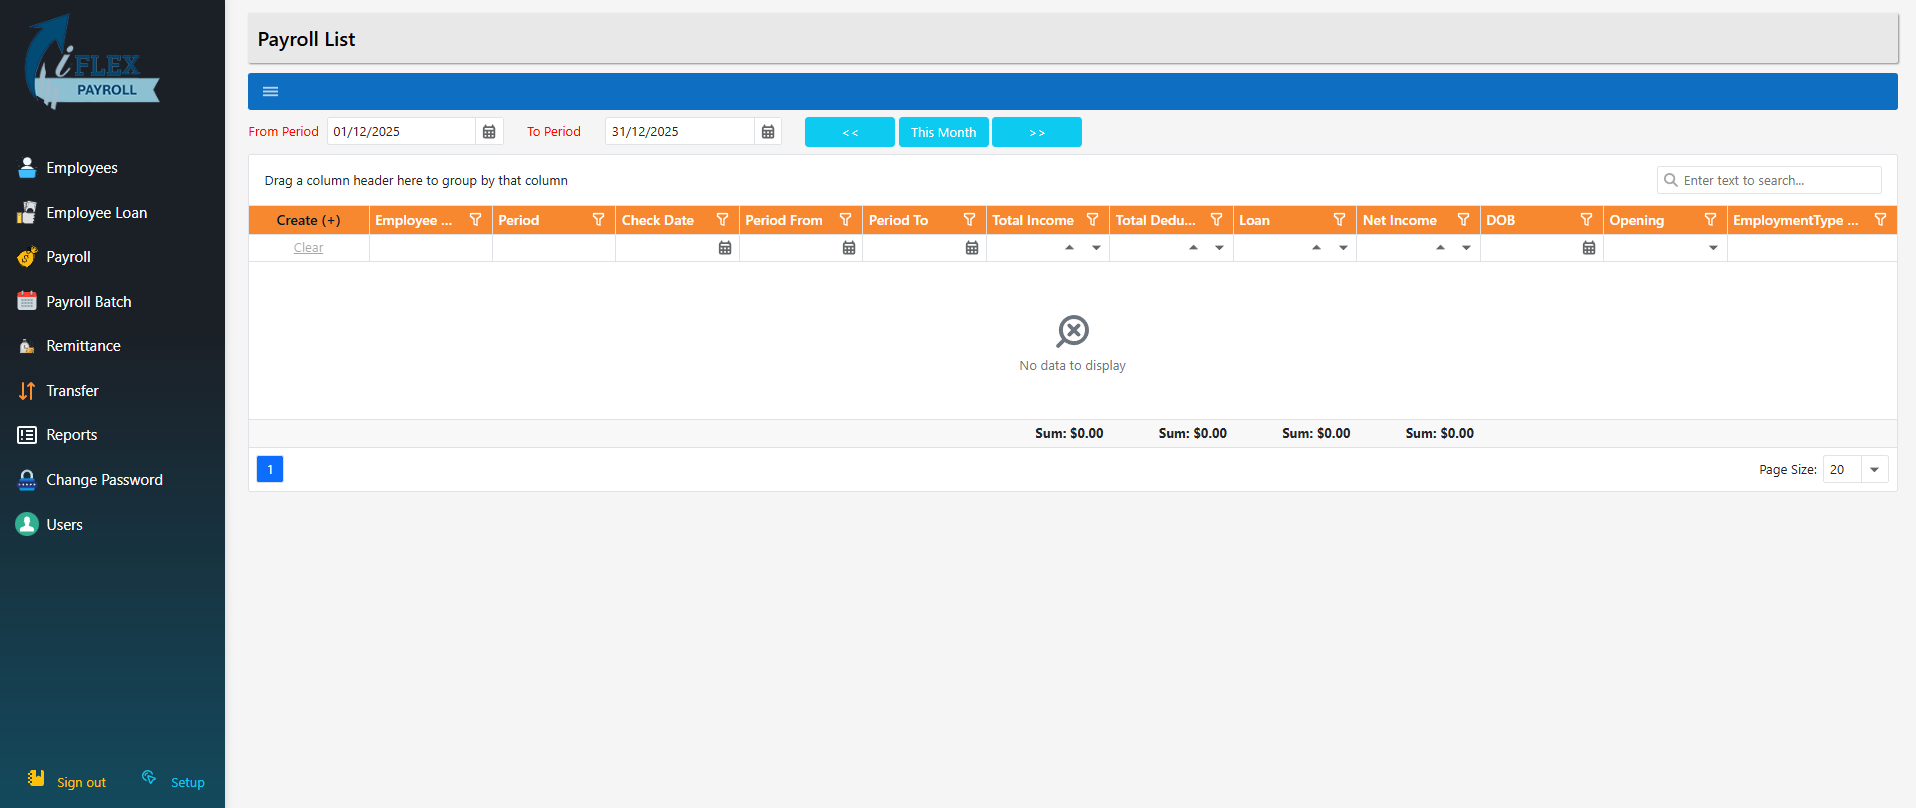
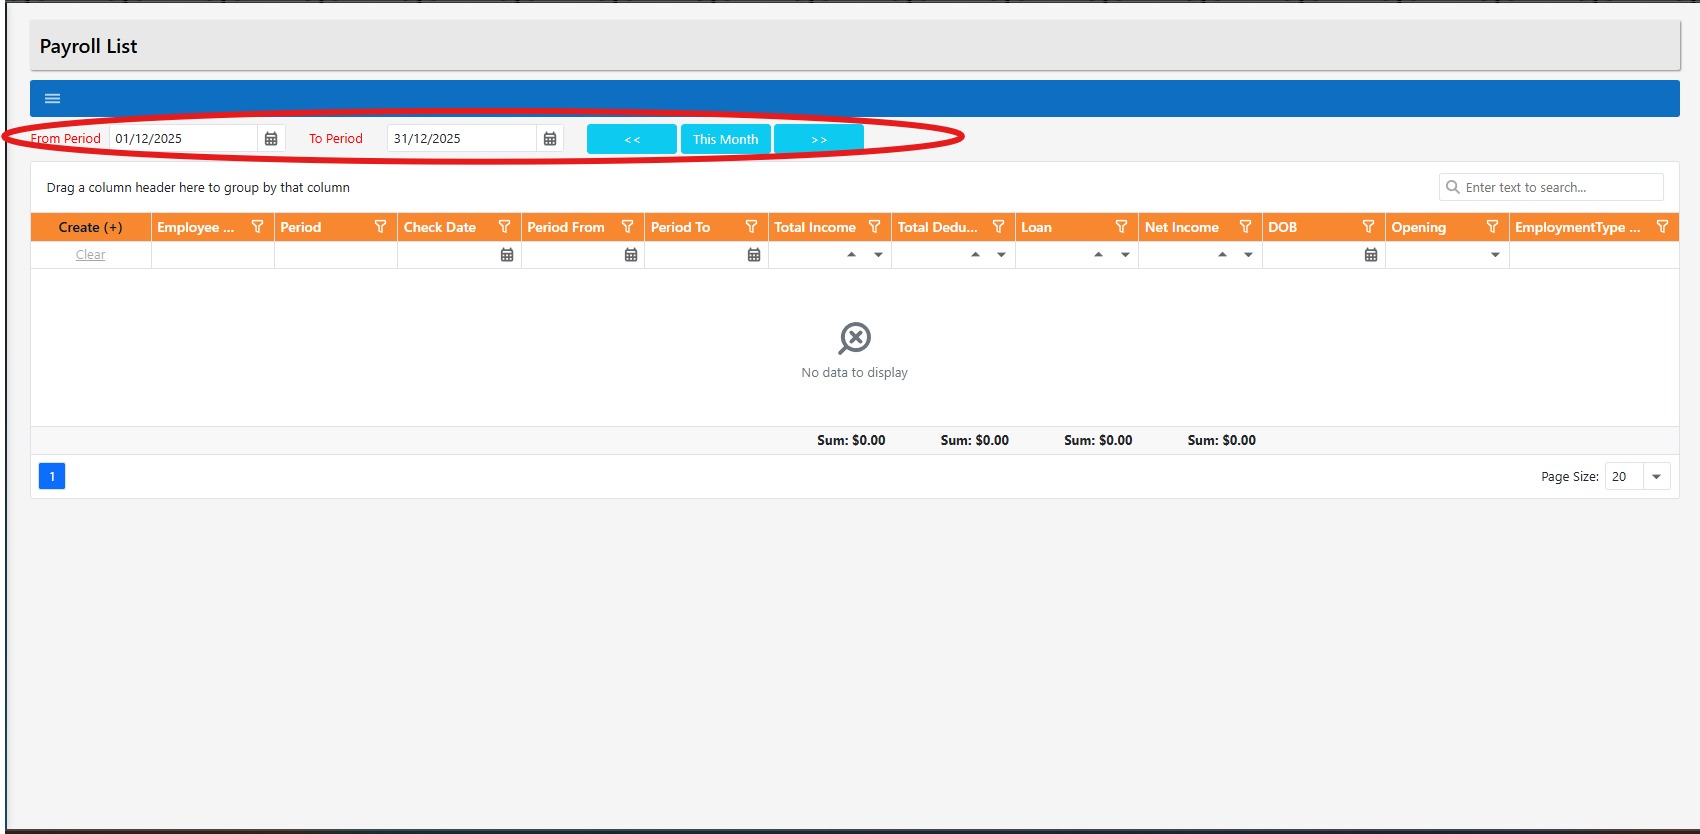
Step 2: Filter payroll by period (optional)
Use the date filters at the top to view payroll entries for a specific range. You can also use This Month and the arrow buttons to move between months.
Step 3: Click Create (+) to start a new payroll
To create a new payroll entry, click Create (+) at the top-left of the grid.
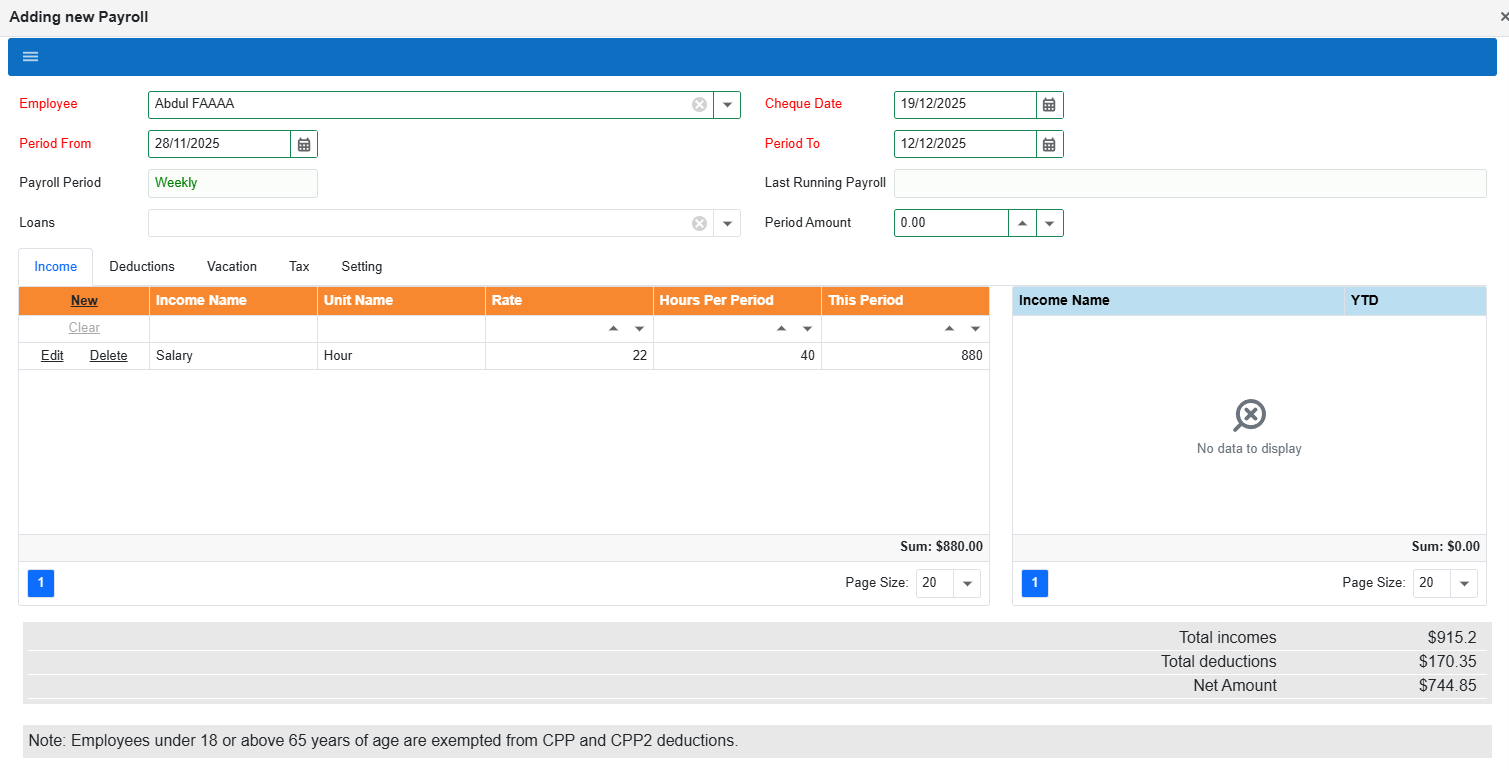
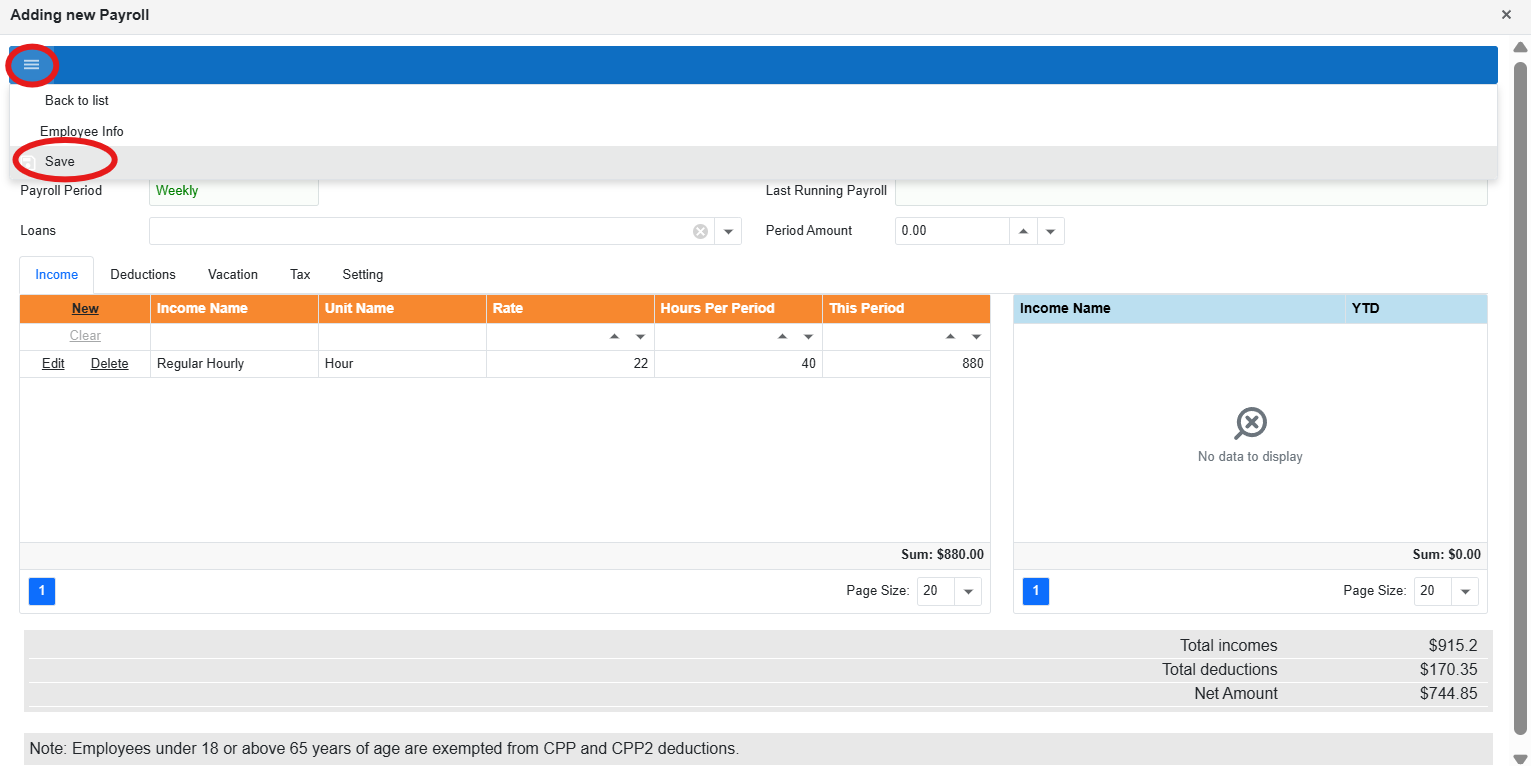
Step 4: The “Adding new Payroll” popup opens
After clicking Create (+), the system opens a popup called Adding new Payroll. This is where you select the employee, choose the pay period dates, and add income/deductions for the period.
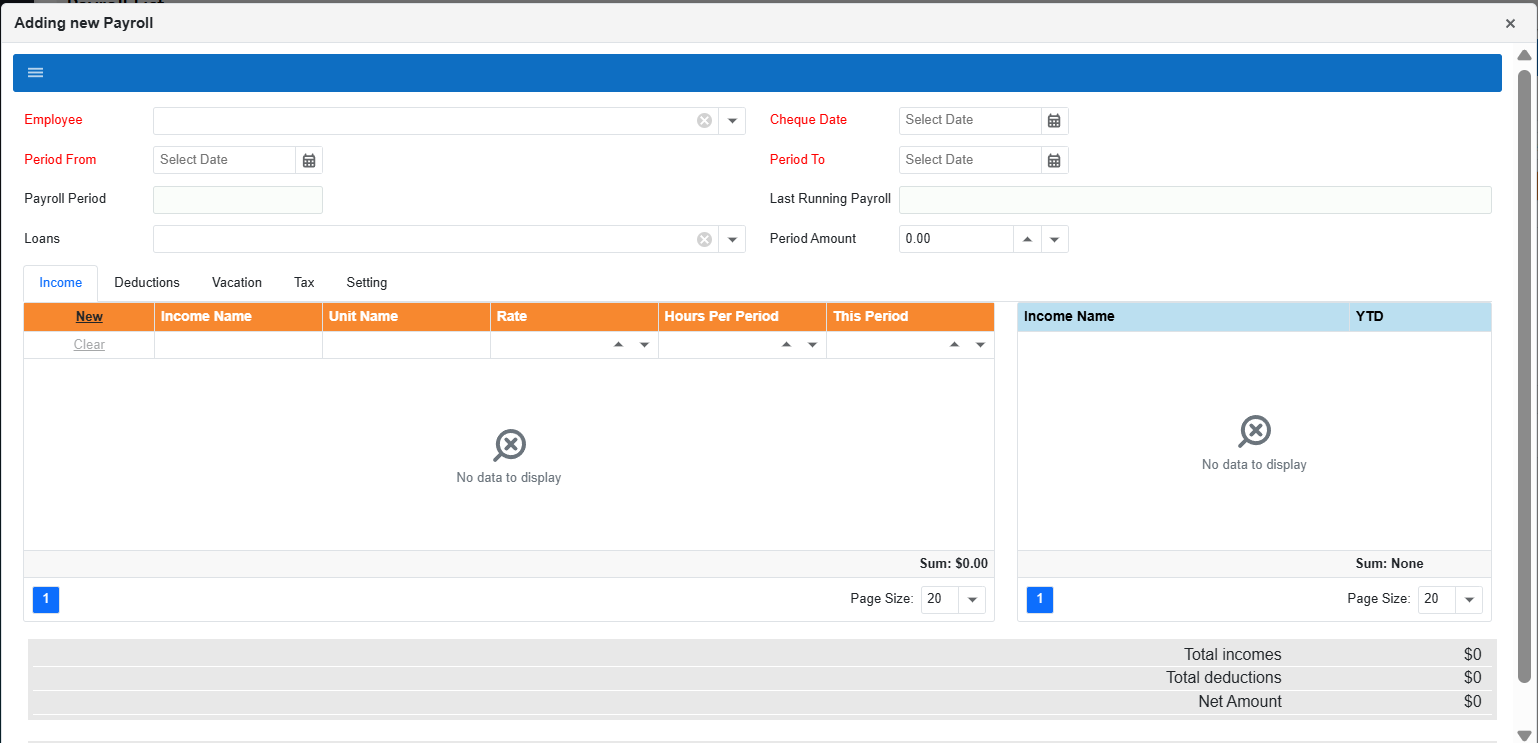
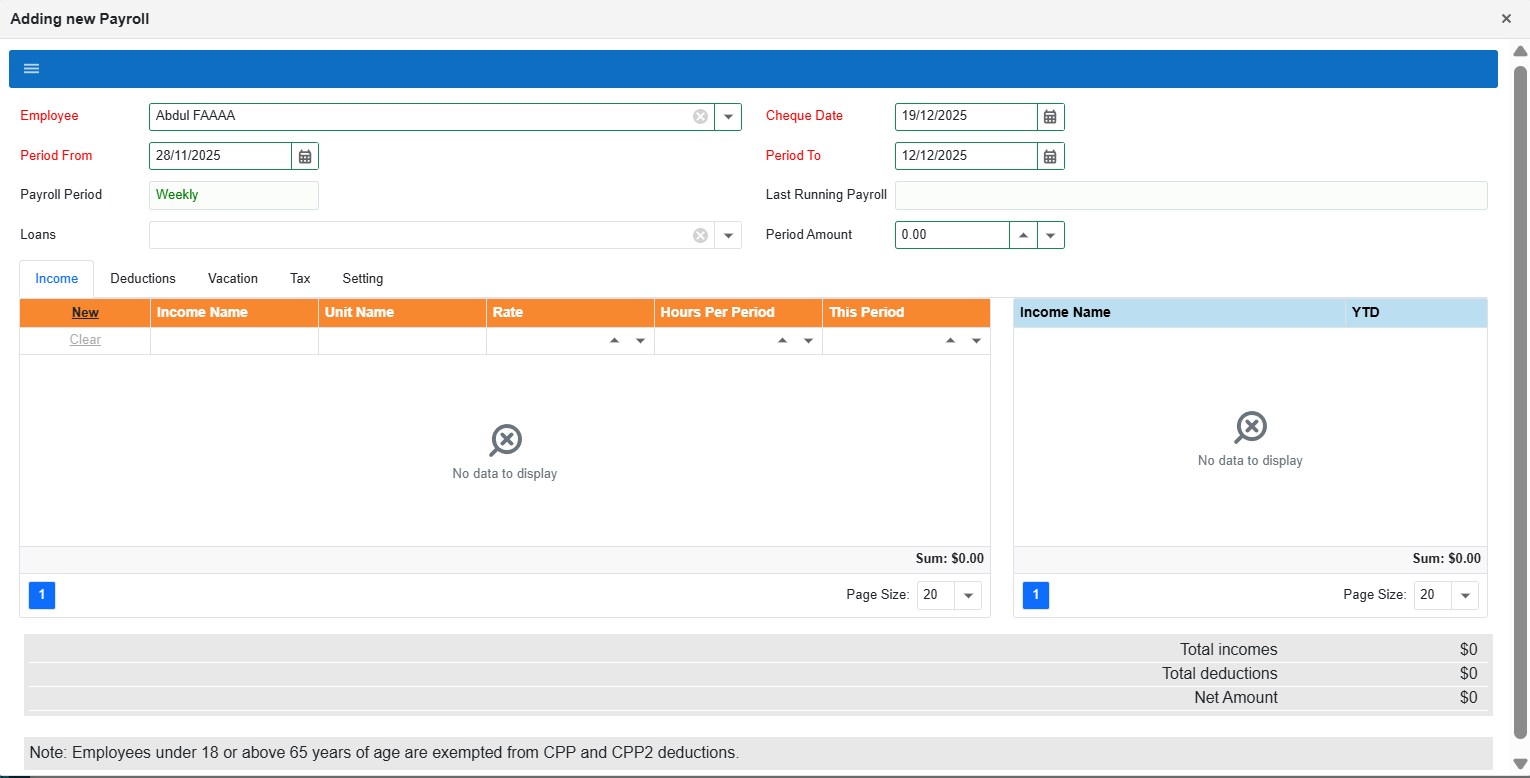
Step 5: Fill the payroll header details
In the top section of the popup, complete these fields:
- Employee – choose the employee you are paying.
- Period From and Period To – the dates the employee worked for this payroll.
- Cheque Date – the date the employee will be paid.
- Payroll Period – automatically shows the employee’s payroll cycle (e.g., Weekly).
- Period Amount – optional manual amount (if your company uses it).
Step 6: Add income and working hours for this period
In the Income tab, click New to add the employee’s income line for this payroll. This is where you enter the rate and the hours/units worked during the selected period.
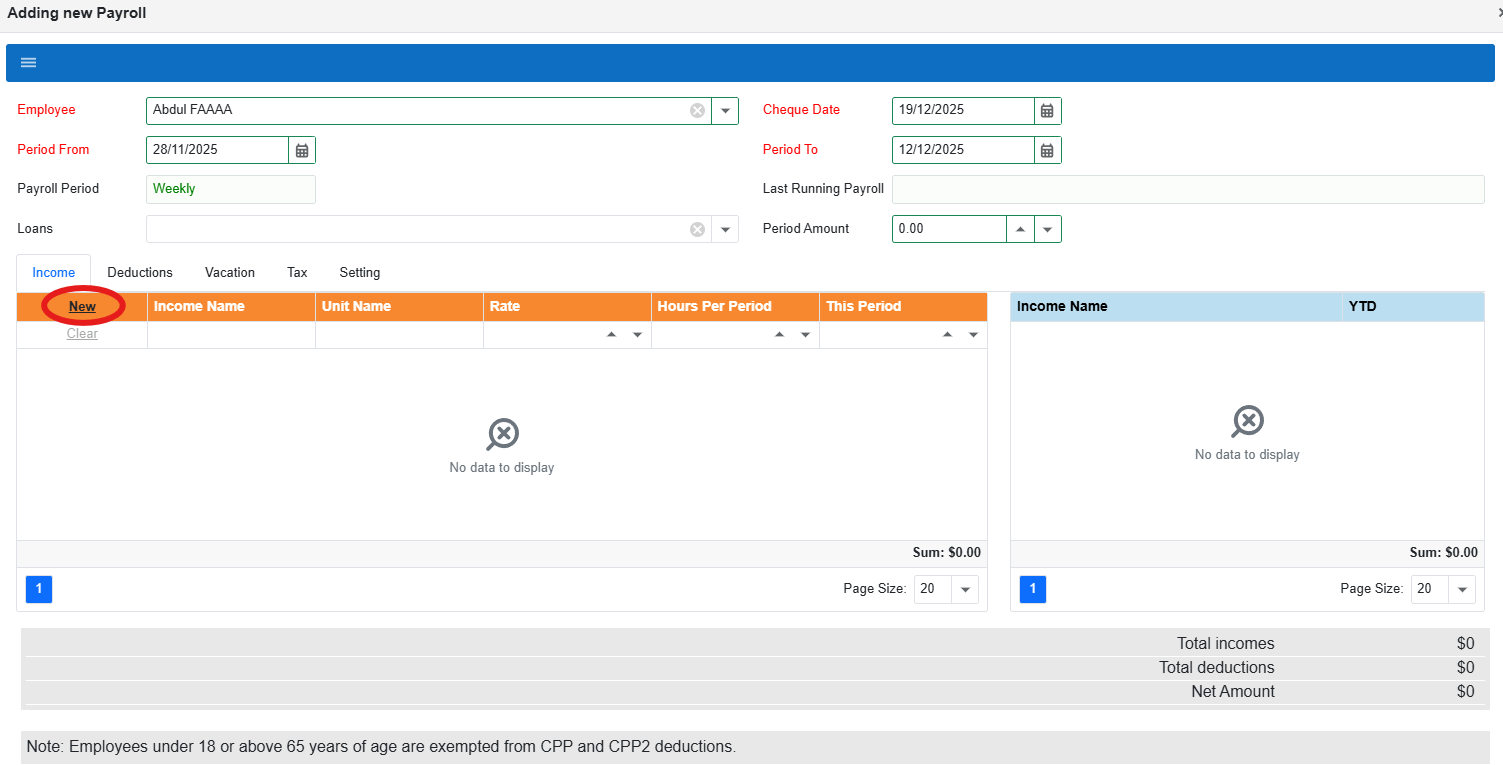
Step 7: Fill the income details, then Save
After clicking New, fill the row details (example values shown below):
- Income Name – e.g., Salary / Hourly.
- Unit Name – e.g., Hour.
- Rate – the pay rate (per hour/unit).
- Hours Per Period – hours worked for this payroll.
- This Period – the calculated period total (or enter if required).
When the row is complete, click Save.
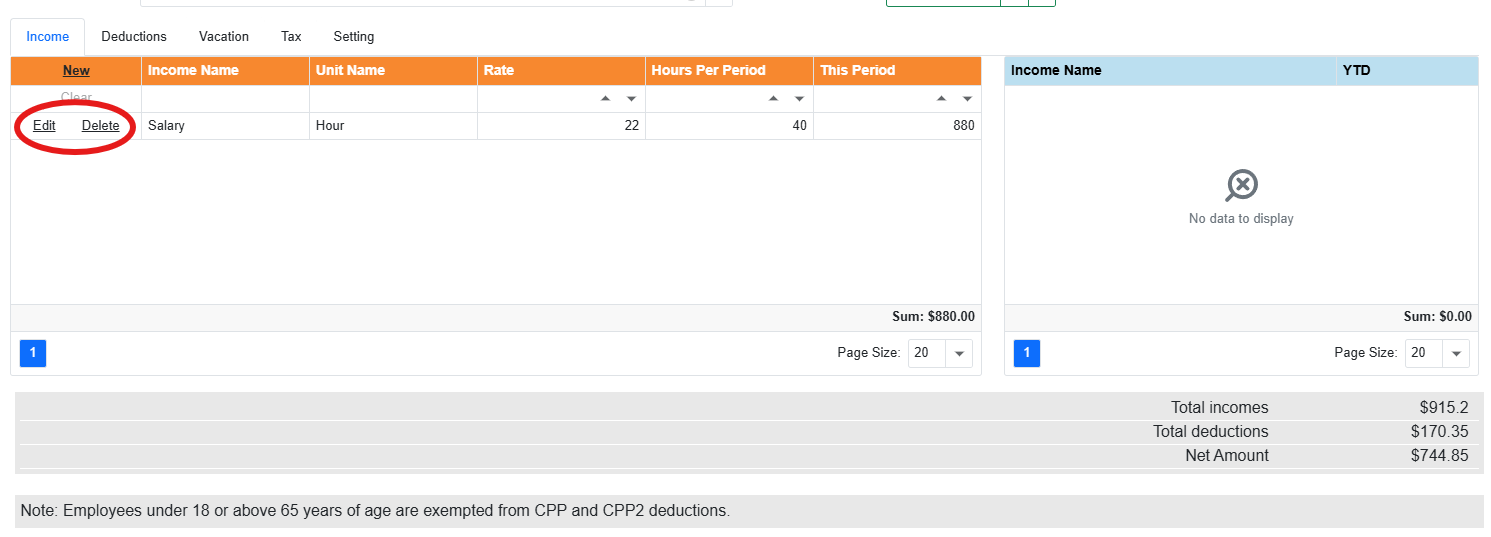
Edit or delete an income line (optional)
If you need to correct an income line, use Edit to update it, or Delete to remove it.
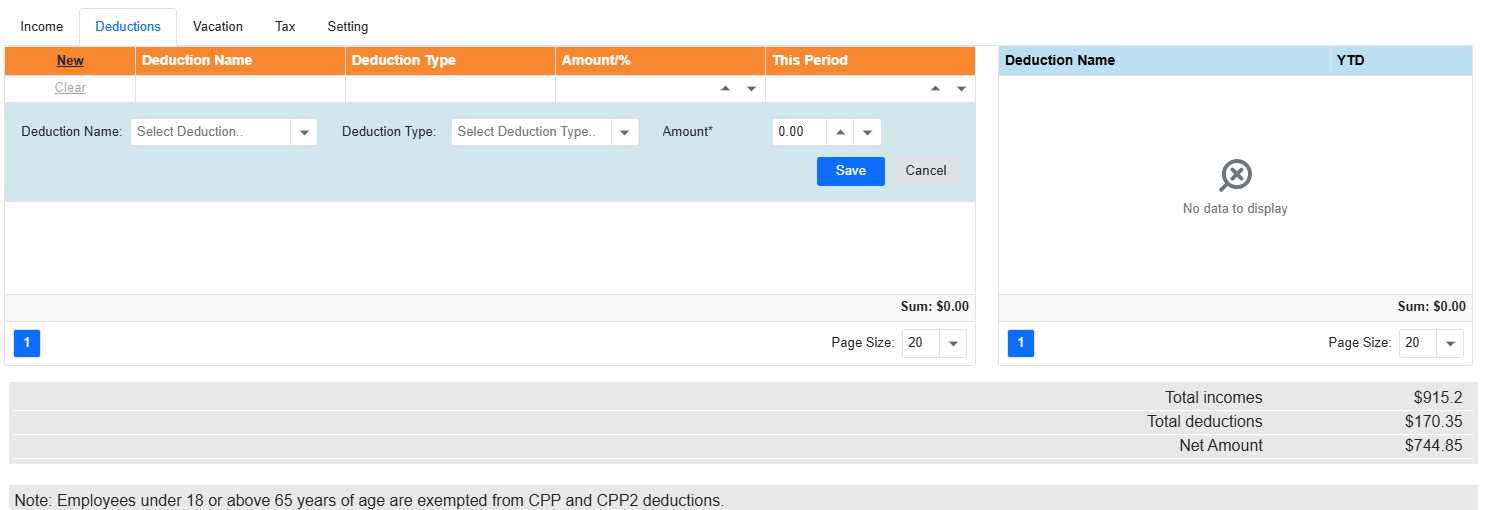
Step 8: Add deductions for this period (optional)
To add a deduction for this payroll, open the Deductions tab.
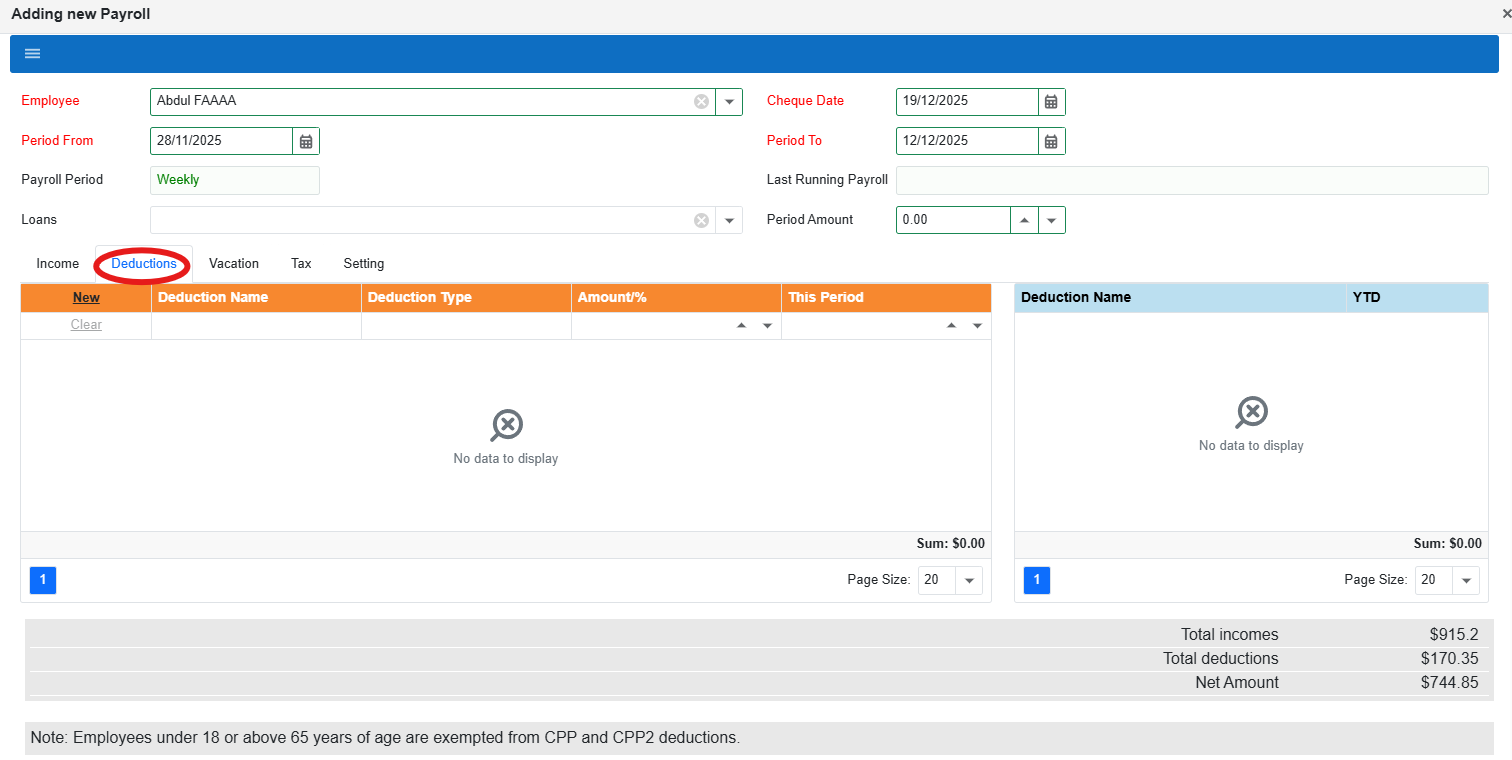
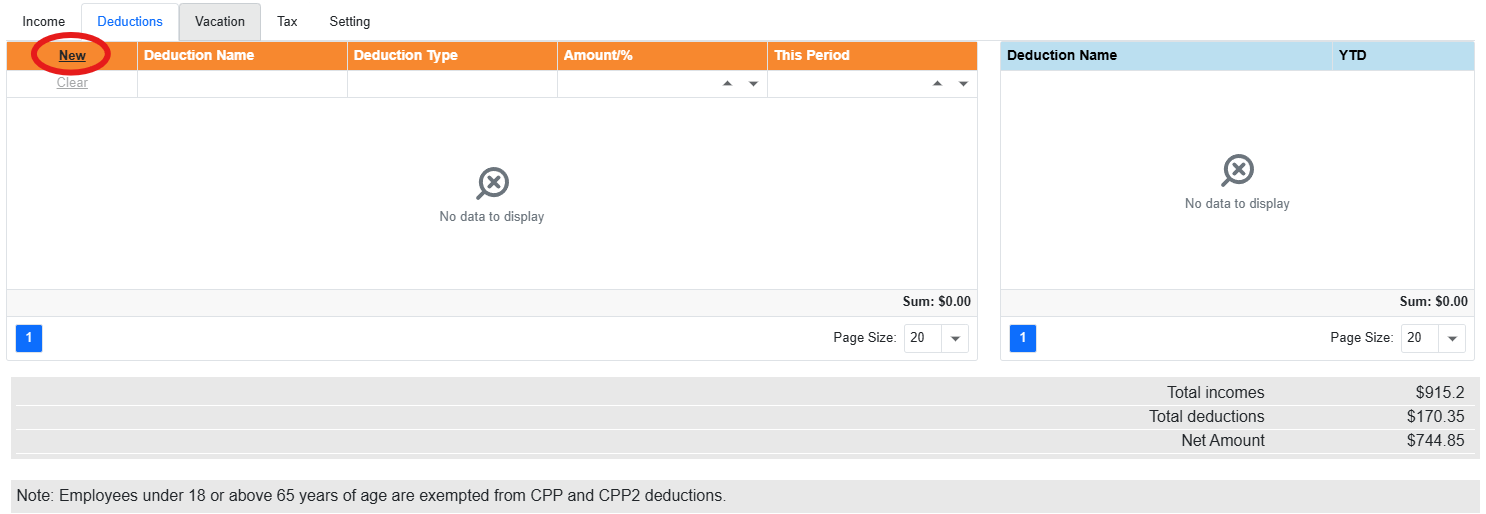
Step 9: Click New and enter the deduction details
Click New, then fill the deduction information (such as deduction name, type, and amount/percentage). Once complete, click Save.
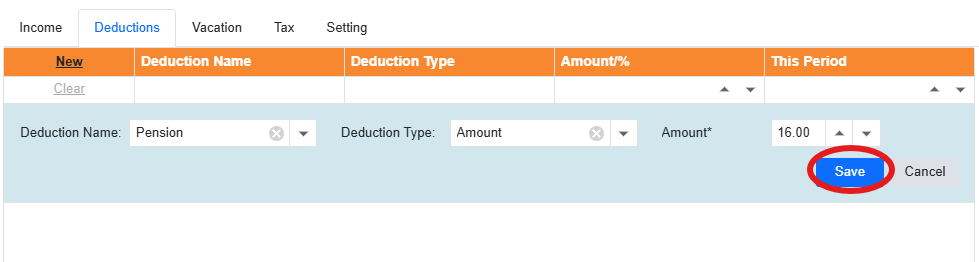
Step 10: Fill the deduction line and Save
After clicking New, a new editable line appears. Fill the fields:
- Deduction Name – choose the deduction (example: Pension).
- Deduction Type – choose Amount or %, based on how the deduction is applied.
- Amount – enter the amount (or percentage) for this payroll period.
When it’s complete, click Save.
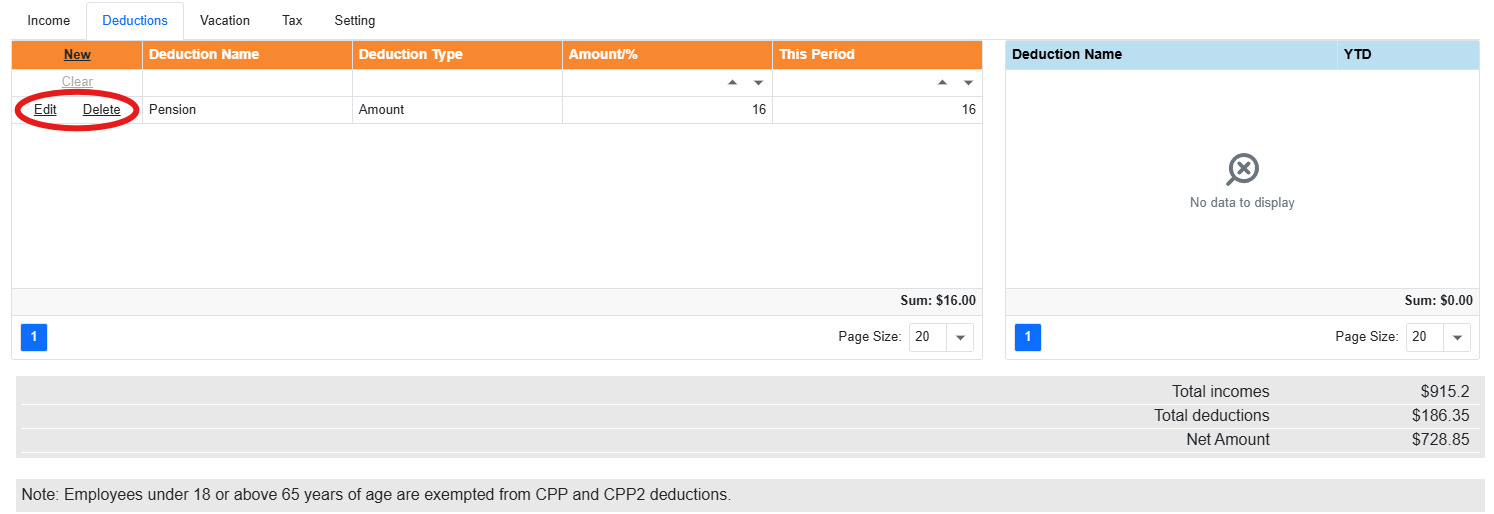
Edit or delete a deduction line (optional)
After the deduction is saved, it appears in the list. Use Edit to change it or Delete to remove it.
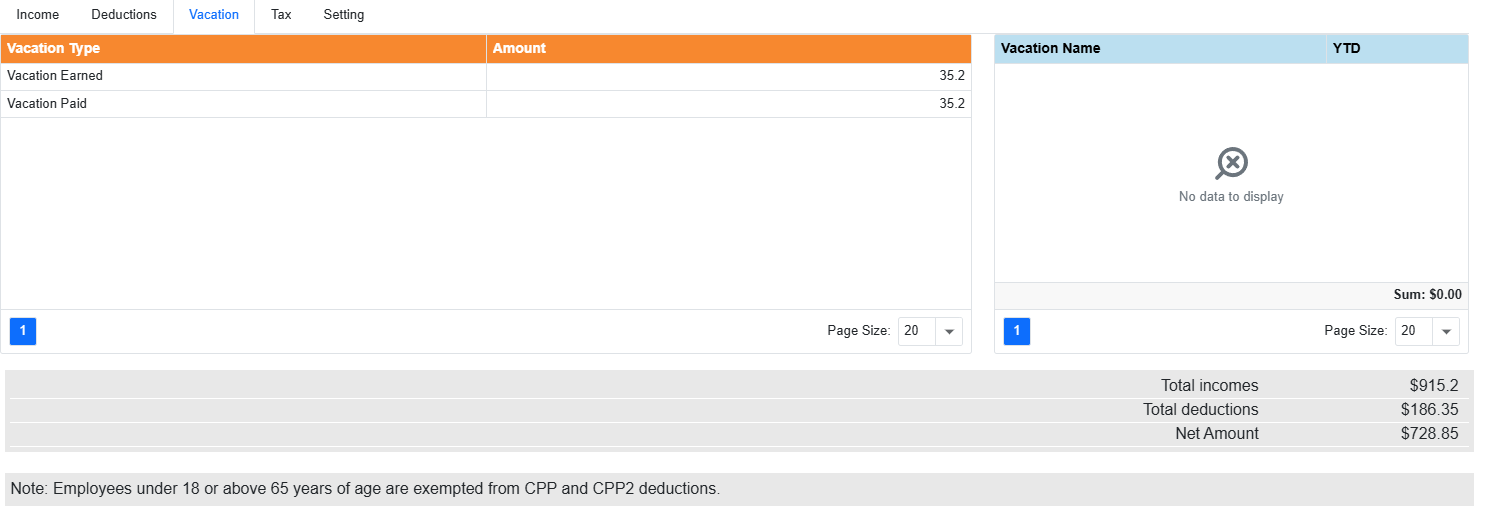
Step 11: Review the Vacation tab
Open the Vacation tab to view the employee’s vacation amounts for this payroll (for example, vacation earned and vacation paid).
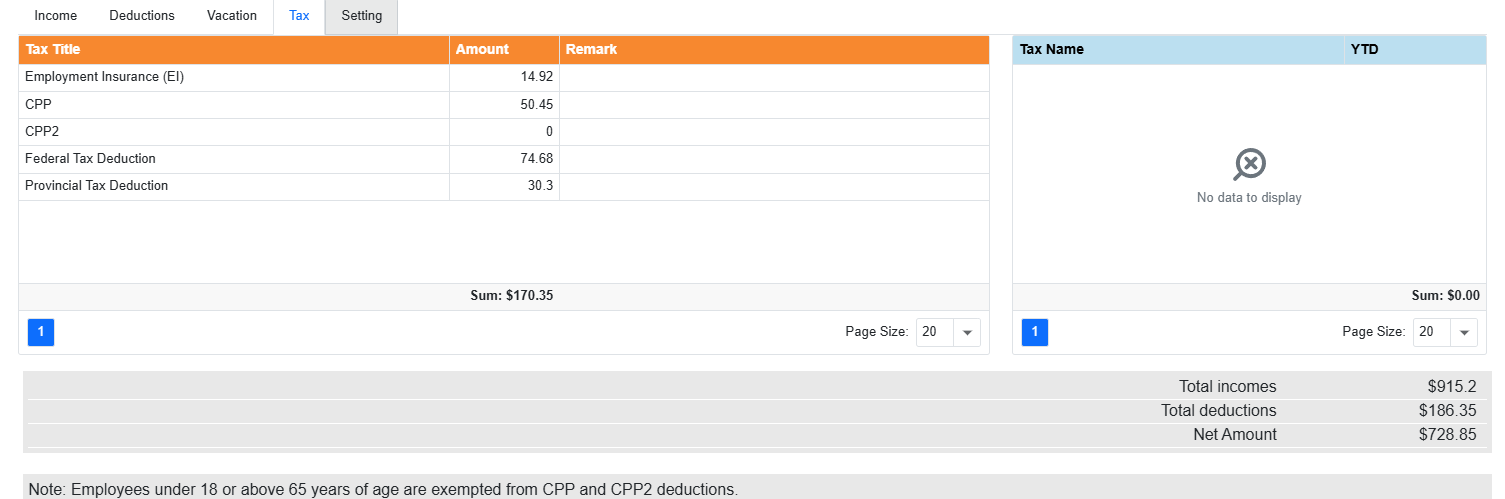
Step 12: Review the Tax tab
Open the Tax tab to review tax deductions calculated for this payroll, such as EI, CPP, CPP2, Federal Tax Deduction, and Provincial Tax Deduction.
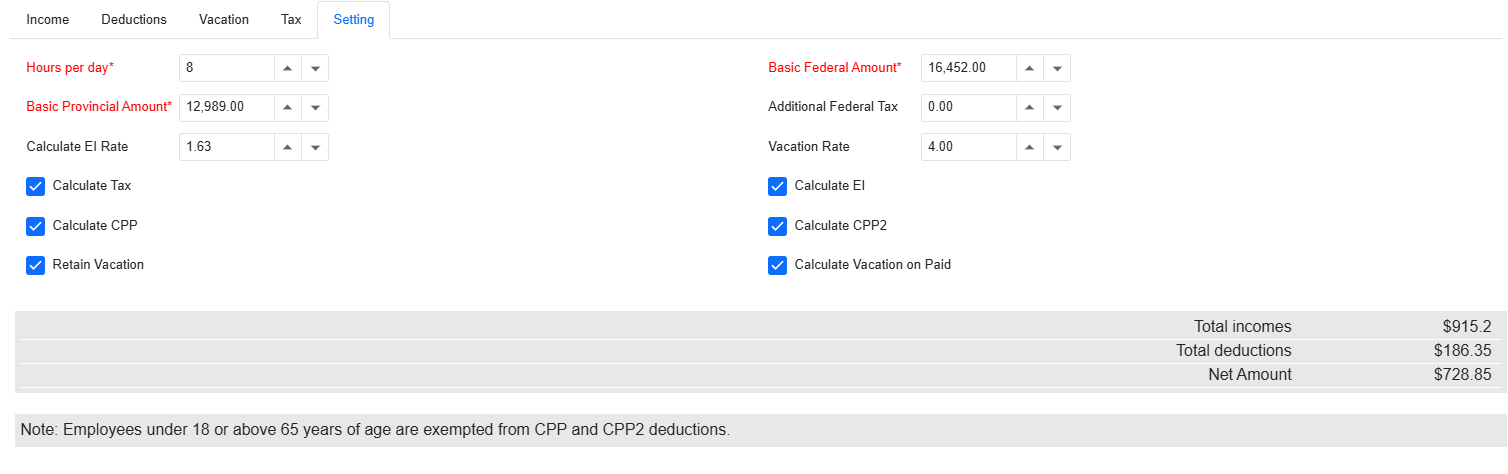
Step 13: Settings tab (usually do not change)
The Setting tab contains payroll calculation settings such as hours per day, vacation rate, and toggles for calculating items like Tax, CPP, EI, and vacation behavior.
Step 14: Save the payroll (Burger menu → Save)
When you finish entering income and deductions, click the burger menu (☰) in the popup, then click Save.
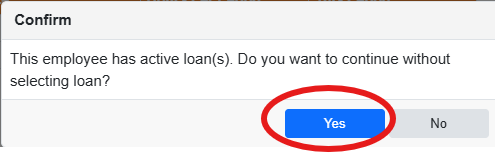
Step 15: Confirm prompts (Loans + Payslip printing)
After saving, you may see confirmation popups:
- Active loans: If the employee has active loans and you didn’t select any, choose Yes to continue without applying loans, or No to go back and add them.
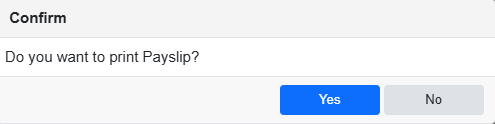
- Print payslip: Choose Yes to open a printable payslip, or No to continue back to the payroll list.
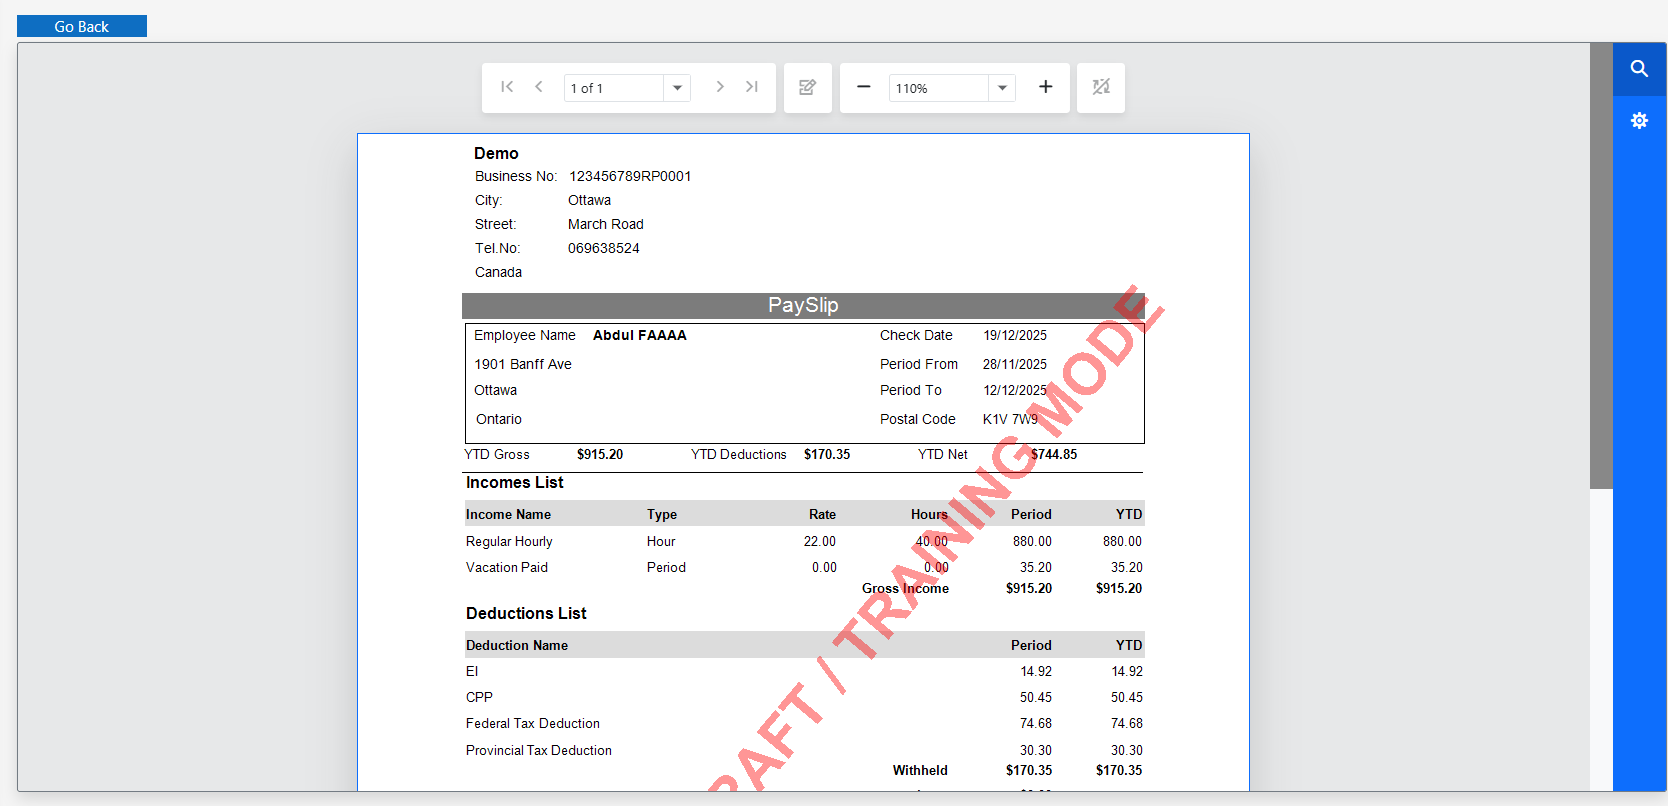
Step 16: Printable payslip (if you clicked Yes)
If you choose Yes to print, the payslip opens in a printable view. If you choose No, you return to the main payroll list.
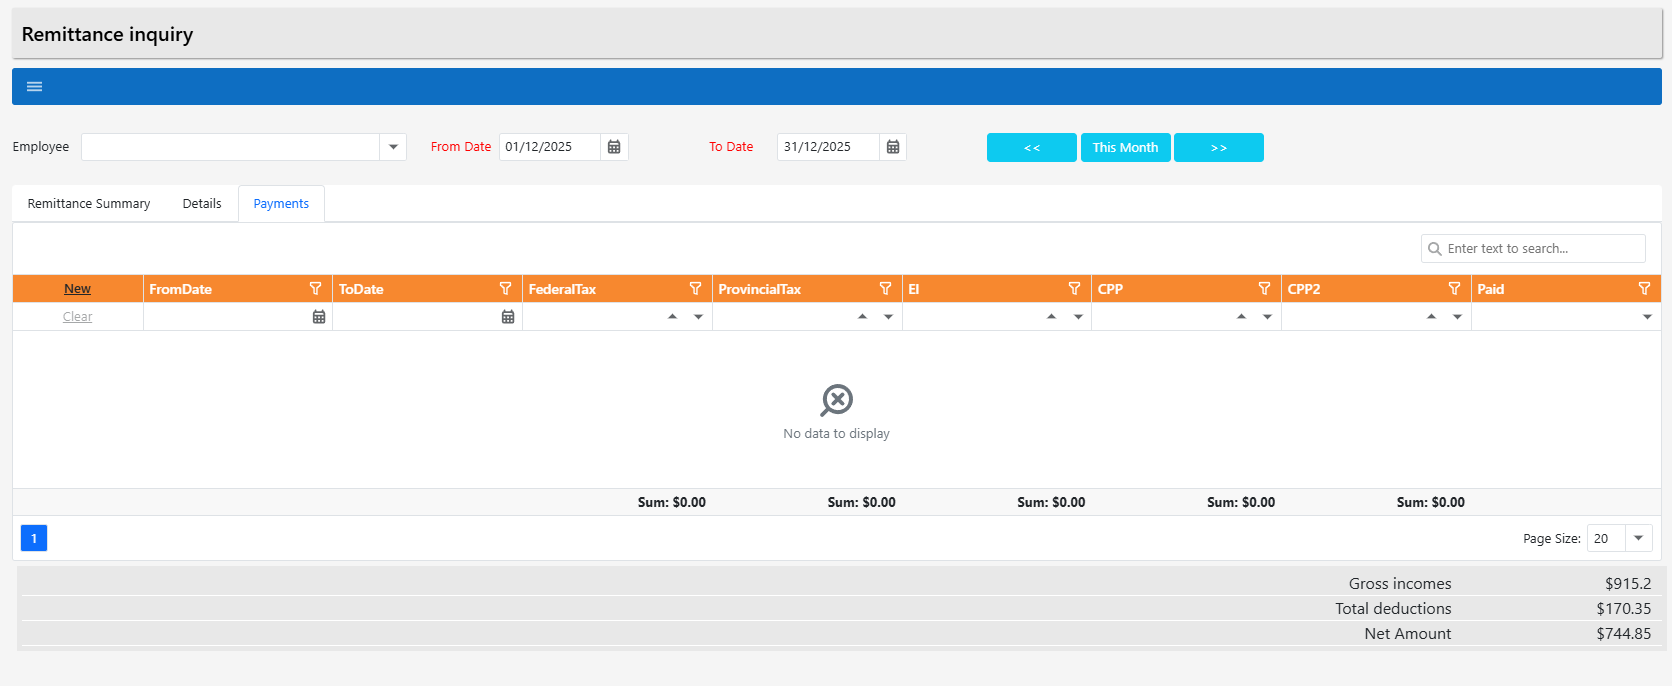
Remittance
Use Remittance to review statutory deductions (CPP, EI, Federal Tax, Provincial Tax) for a selected period, see the detailed transactions behind them, and record when remittances have been paid.
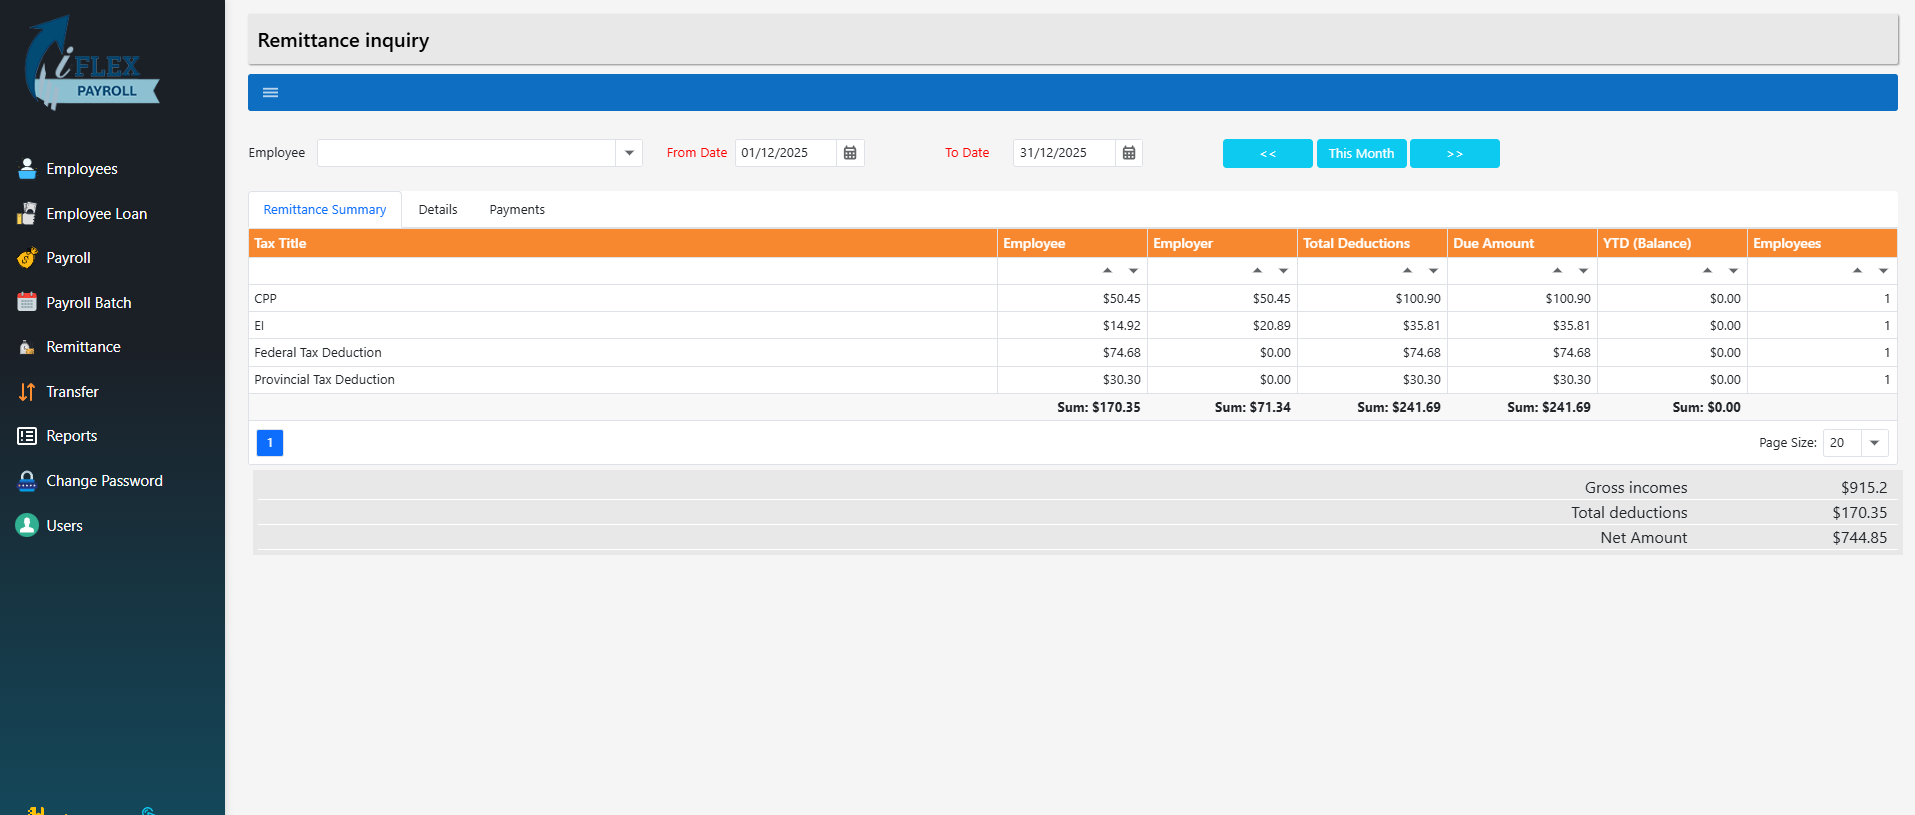
Step 1: Open Remittance (main page)
From the left menu, click Remittance. You land on the Remittance inquiry page. Here you can review totals for all employees in the selected date range: Employee, Employer, Total Deductions, Due Amount, and YTD (Balance).
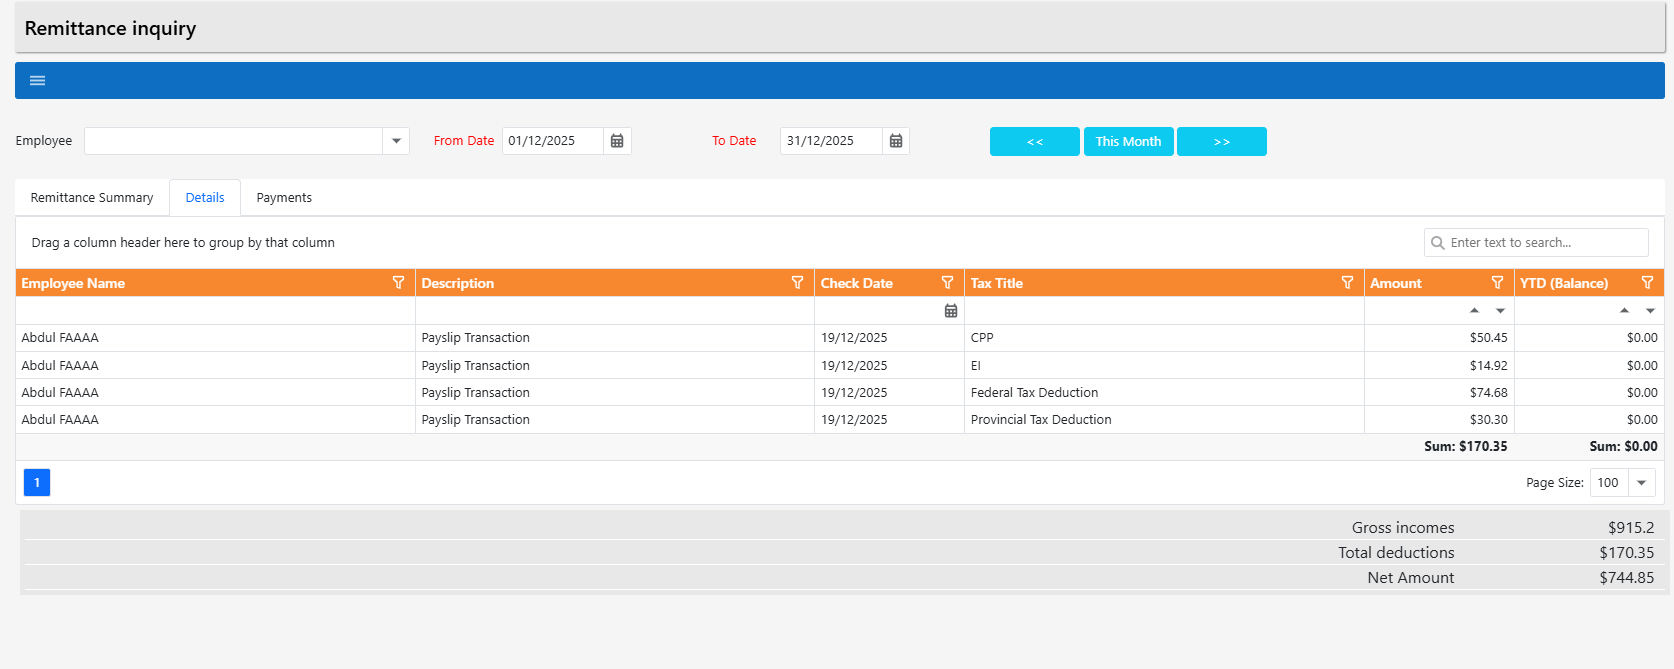
Step 2: Use the Details tab to see where amounts came from
Click Details to view the underlying transactions. This shows which employees had deductions and the payslip transaction details (for example: CPP deducted for a specific employee on a specific cheque date).
Step 3: Open the Payments tab (record remittance payments)
Click Payments to view all remittance payments recorded in the system for the selected period. This is where you add new remittances and mark them as paid.
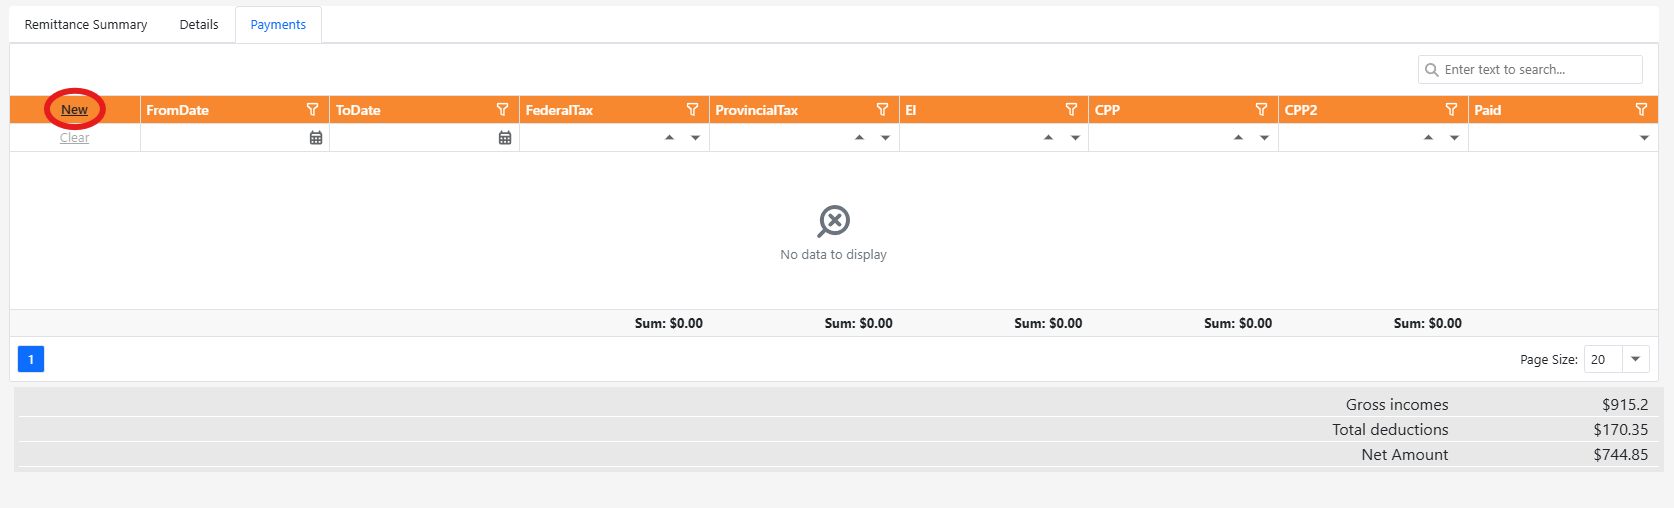
Step 4: Click New to add a remittance payment
To add a remittance record, click New at the top-left of the Payments grid.
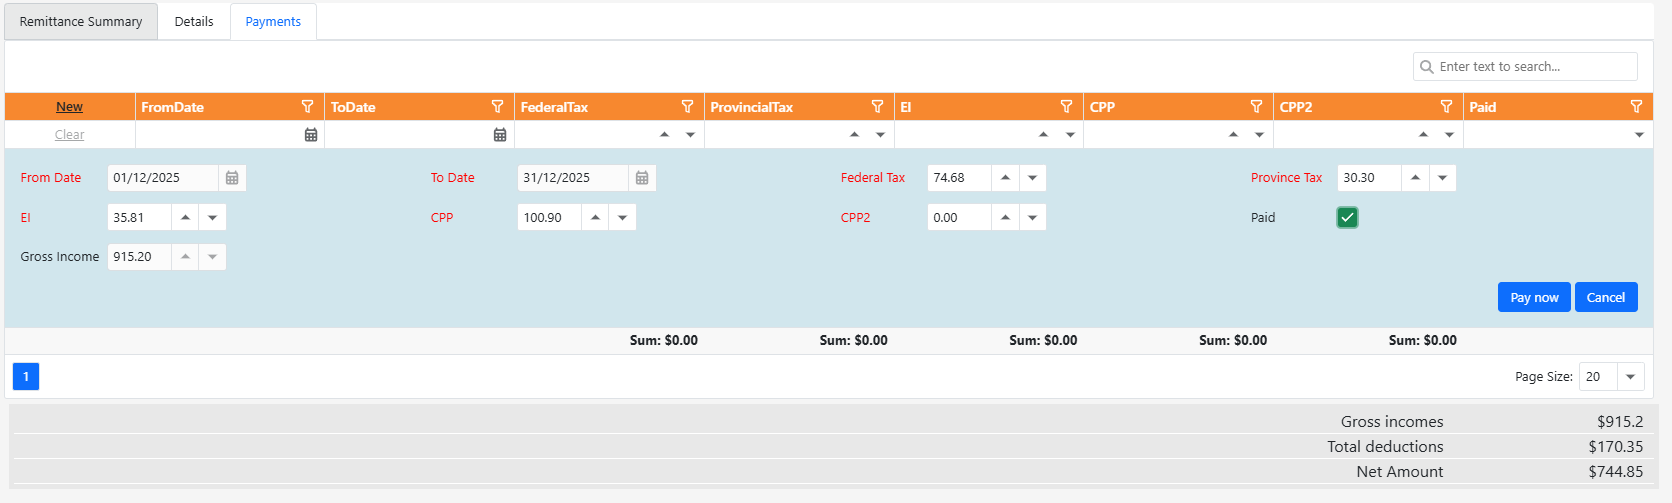
Step 5: Fill the payment values for the selected period
After clicking New, fill the payment fields. Values should match the selected period and the payslips already processed for that period. The numbers are typically up to date based on payslips in the date range, but you can adjust them if needed.
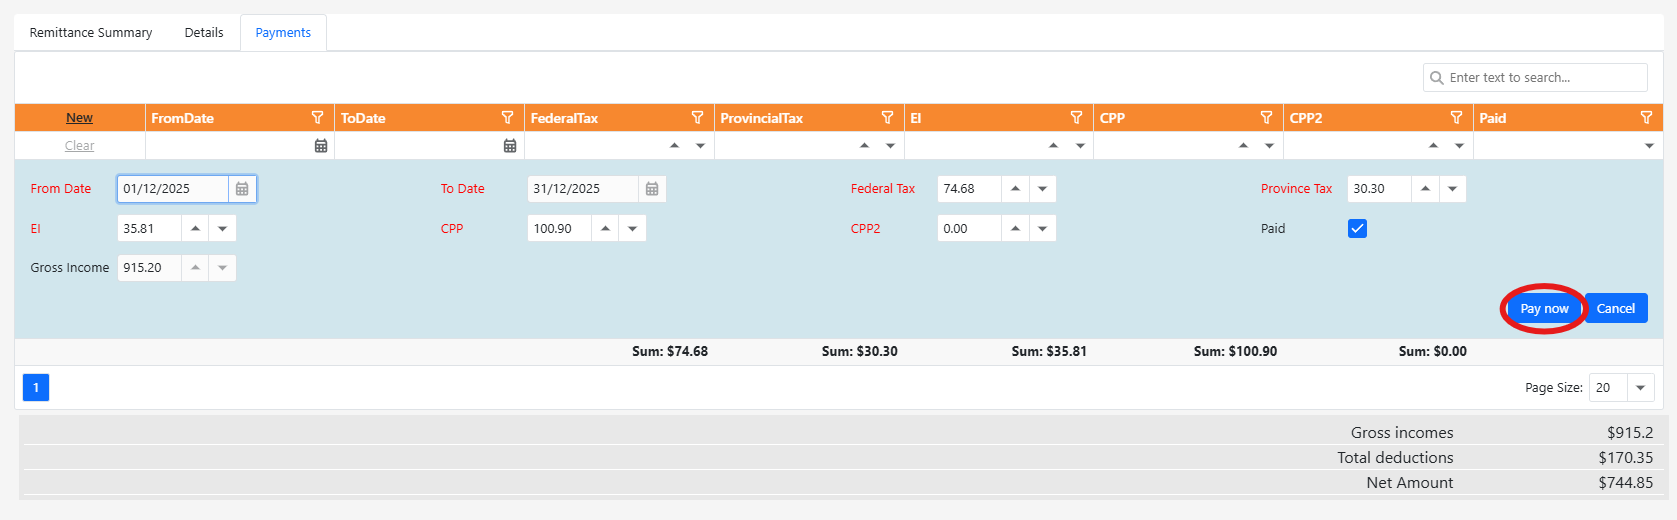
Step 6: Click Pay now after you pay Government of Canada
Once the remittance has been paid externally (Government of Canada), click Pay now to mark it as paid in the system.
Step 7: Edit or delete recorded remittances
After saving a remittance payment, it appears in the list. Use Edit to update it or Delete to remove it.

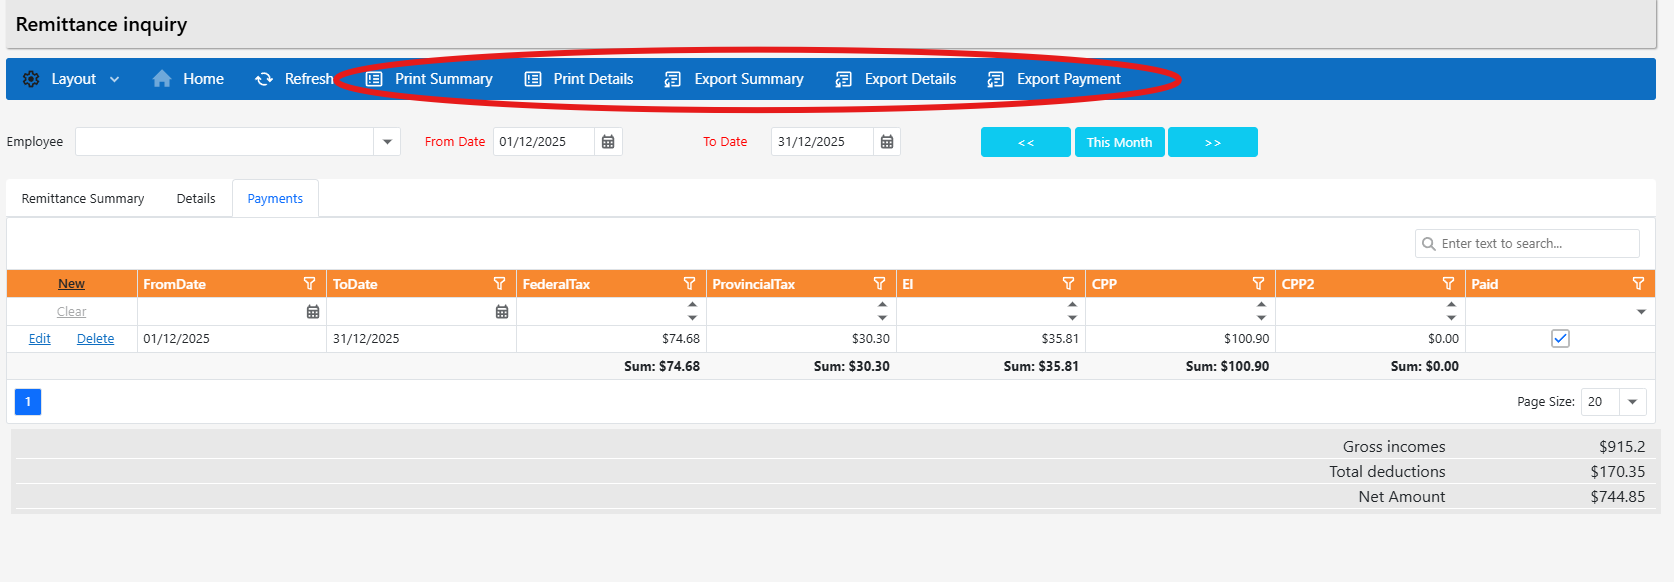
Step 8: Print and export (top toolbar)
Use the top toolbar to print or export summaries, details, or payments. Options include Print Summary, Print Details, Export Summary, Export Details, and Export Payment.
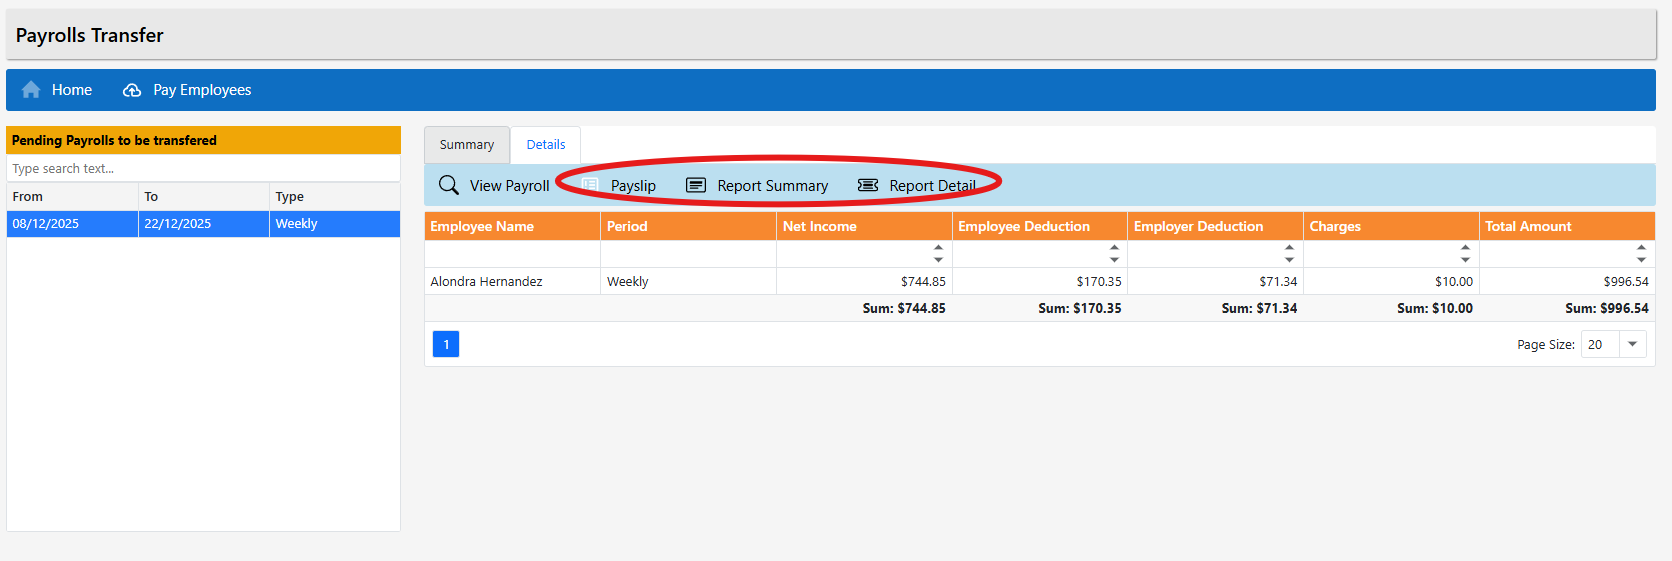
Transfer (Pay Employees)
Use Transfer to pay employees for completed payroll periods. Once a transfer is processed, funds are sent to employees automatically based on their payment setup.
Step 1: Open Transfer (home page)
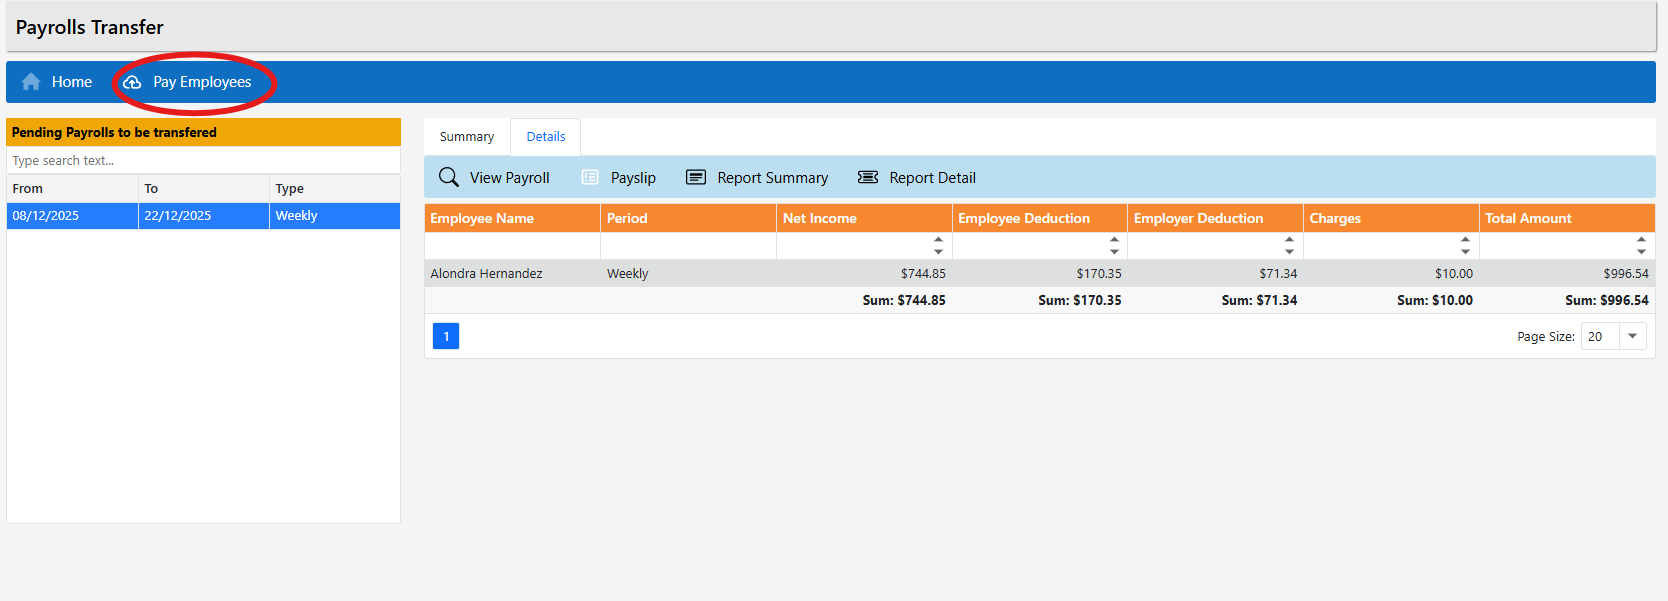
From the left menu, click Transfer. This opens the Payrolls Transfer page, where you can review pending payrolls that are ready to be paid.
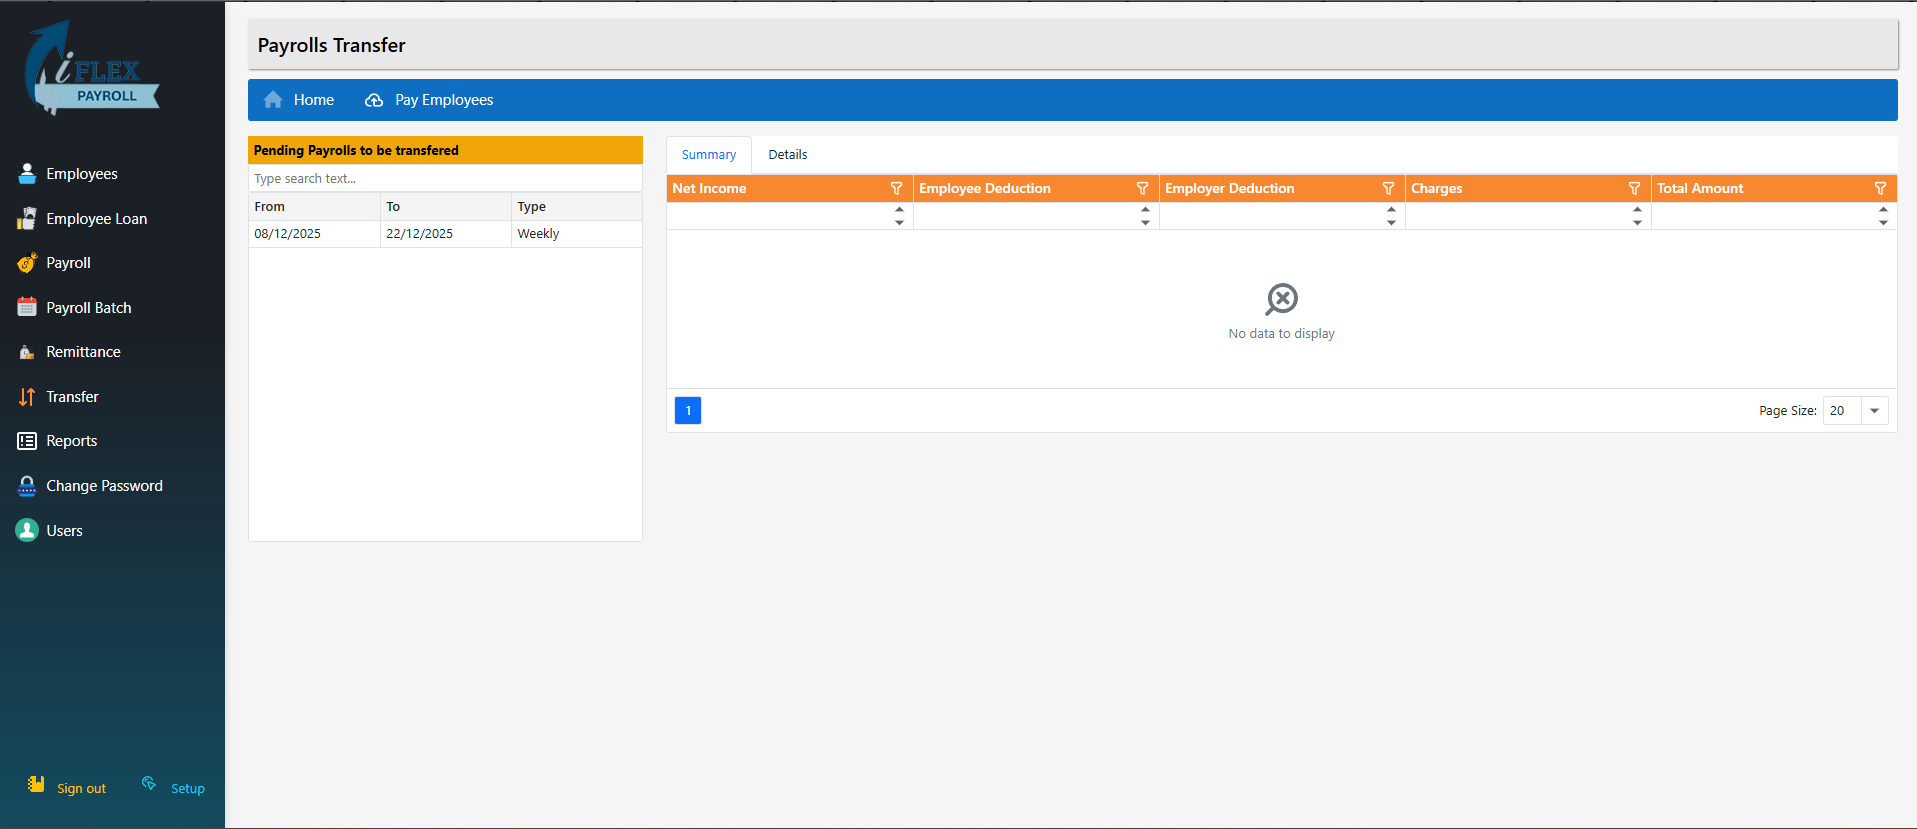
Step 2: Select the payroll period to pay
Select the payroll period you want to pay from the list on the left. Each row represents a completed payroll period (for example: Weekly, Biweekly, or Monthly).

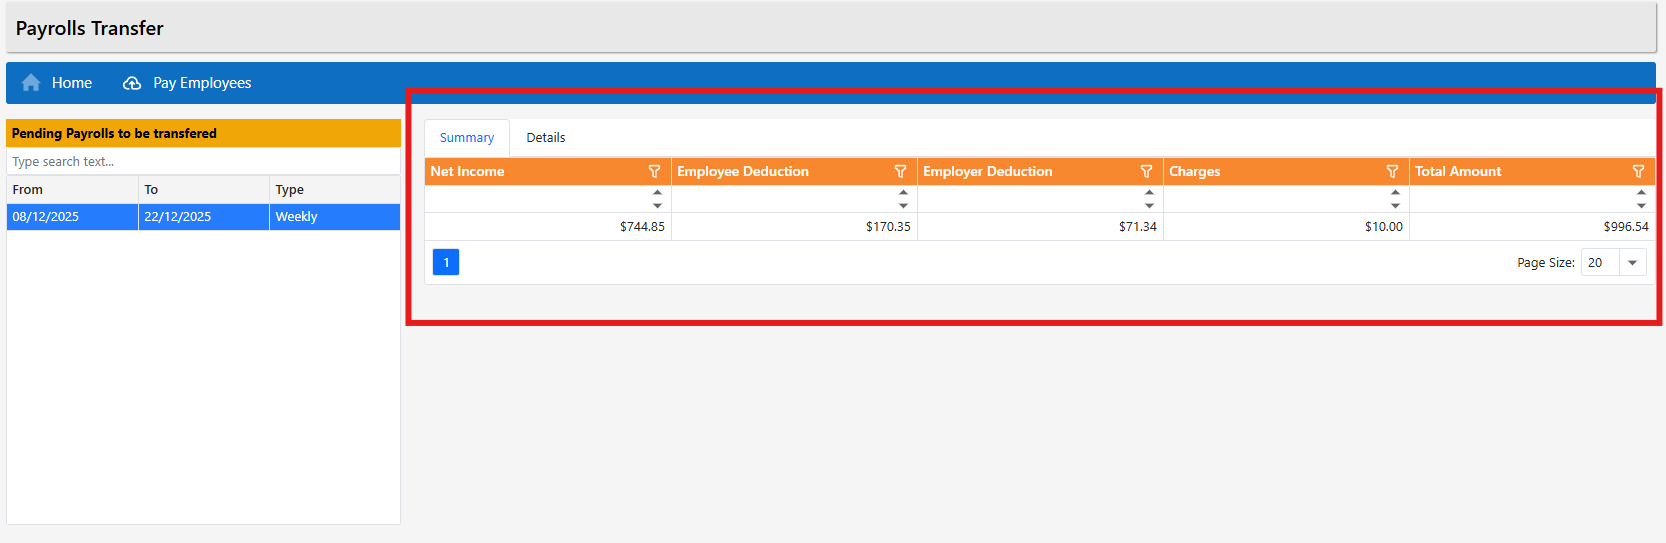
Step 3: Review the Summary tab
The Summary tab shows a high-level breakdown of the transfer: Net Income, Employee Deductions, Employer Deductions, Charges, and the Total Amount that will be paid from your account.
Step 4: Review the Details tab
Click the Details tab to see the exact amounts per employee. This view shows how much each employee will receive and how the totals are calculated.
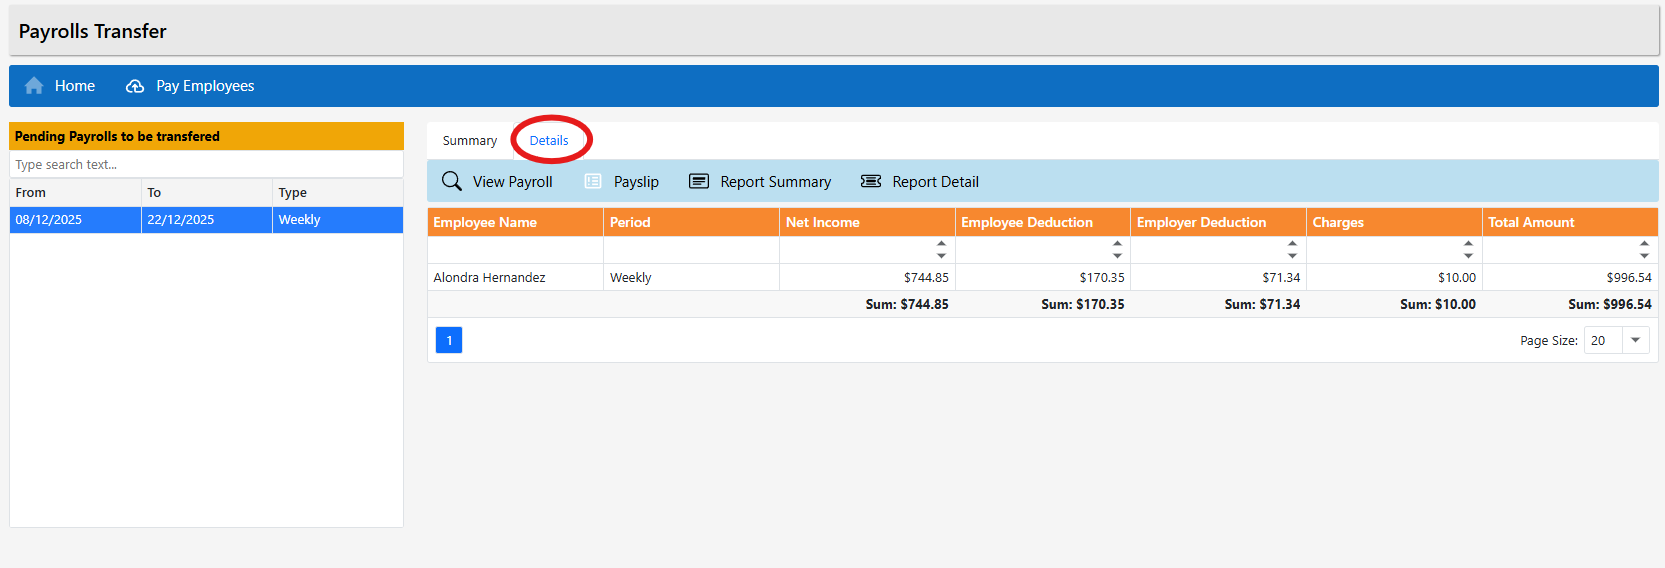
Step 5: Print reports and view payslips
From the toolbar above the grid, you can:
- View Payroll
- Payslip (select an employee, then click Payslip)
- Report Summary
- Report Detail
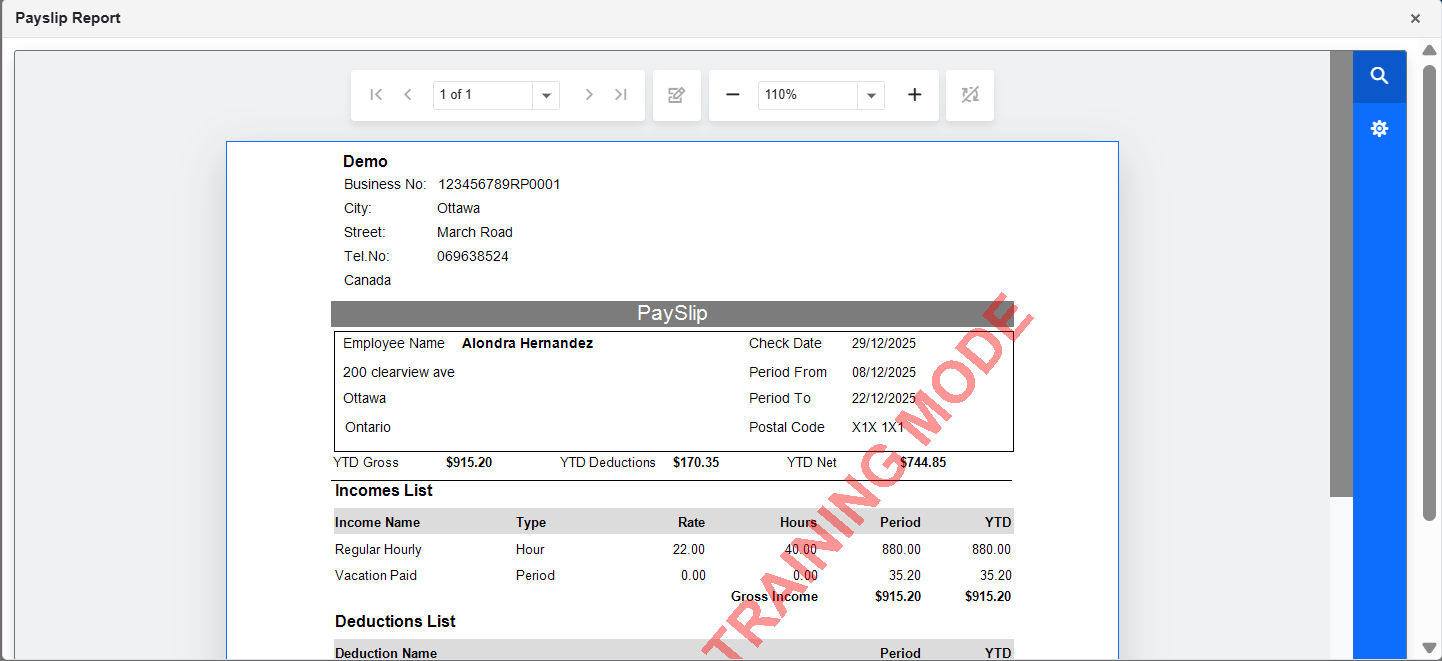
Step 6: View payslip report
To view a payslip, select an employee from the Details grid and click Payslip. A printable payslip report opens for the selected employee and period.
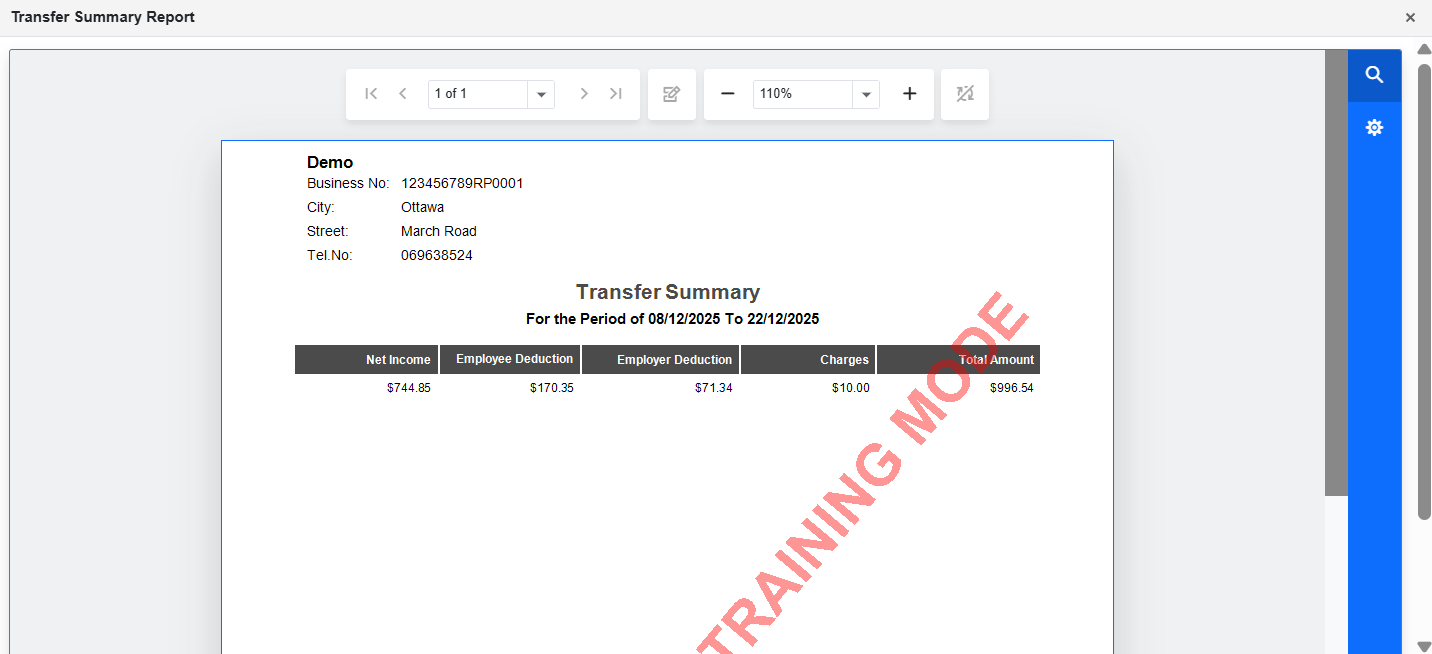
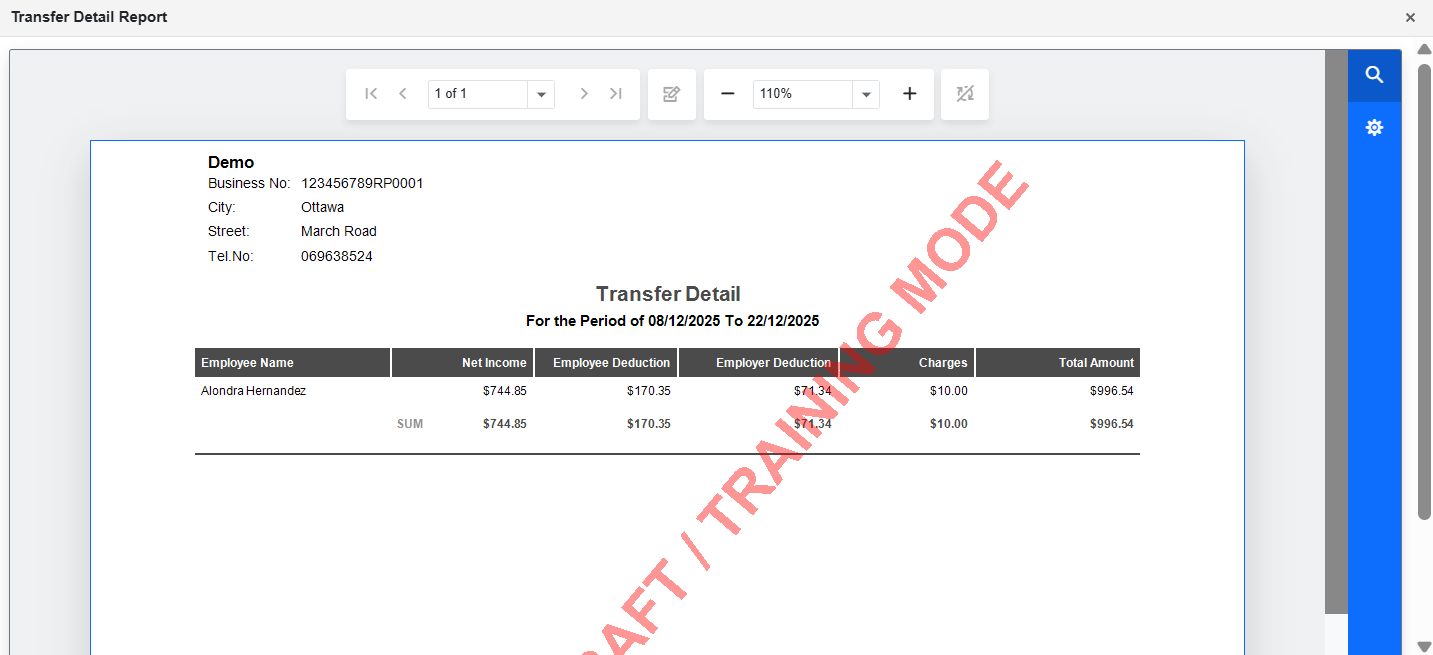
Step 7: View transfer reports
Use Report Summary and Report Detail to generate printable transfer reports for the selected payroll period.
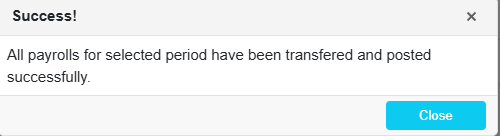
Step 8: Pay employees
When everything is reviewed and ready, click Pay Employees. The system sends payments to employees automatically.
Step 9: Confirmation
After a successful transfer, a confirmation message appears. The payroll is now marked as paid and the process is complete.
Reports Overview
The Reports page is a central location where you can access payroll, employee, tax, and general reference reports. Each report opens in a new view and can usually be printed or exported depending on your browser settings.
Step 1: Open the Reports page
From the left-side menu, click Reports. The Reports List screen will open. This screen is divided into sections such as Payslip reports and General.
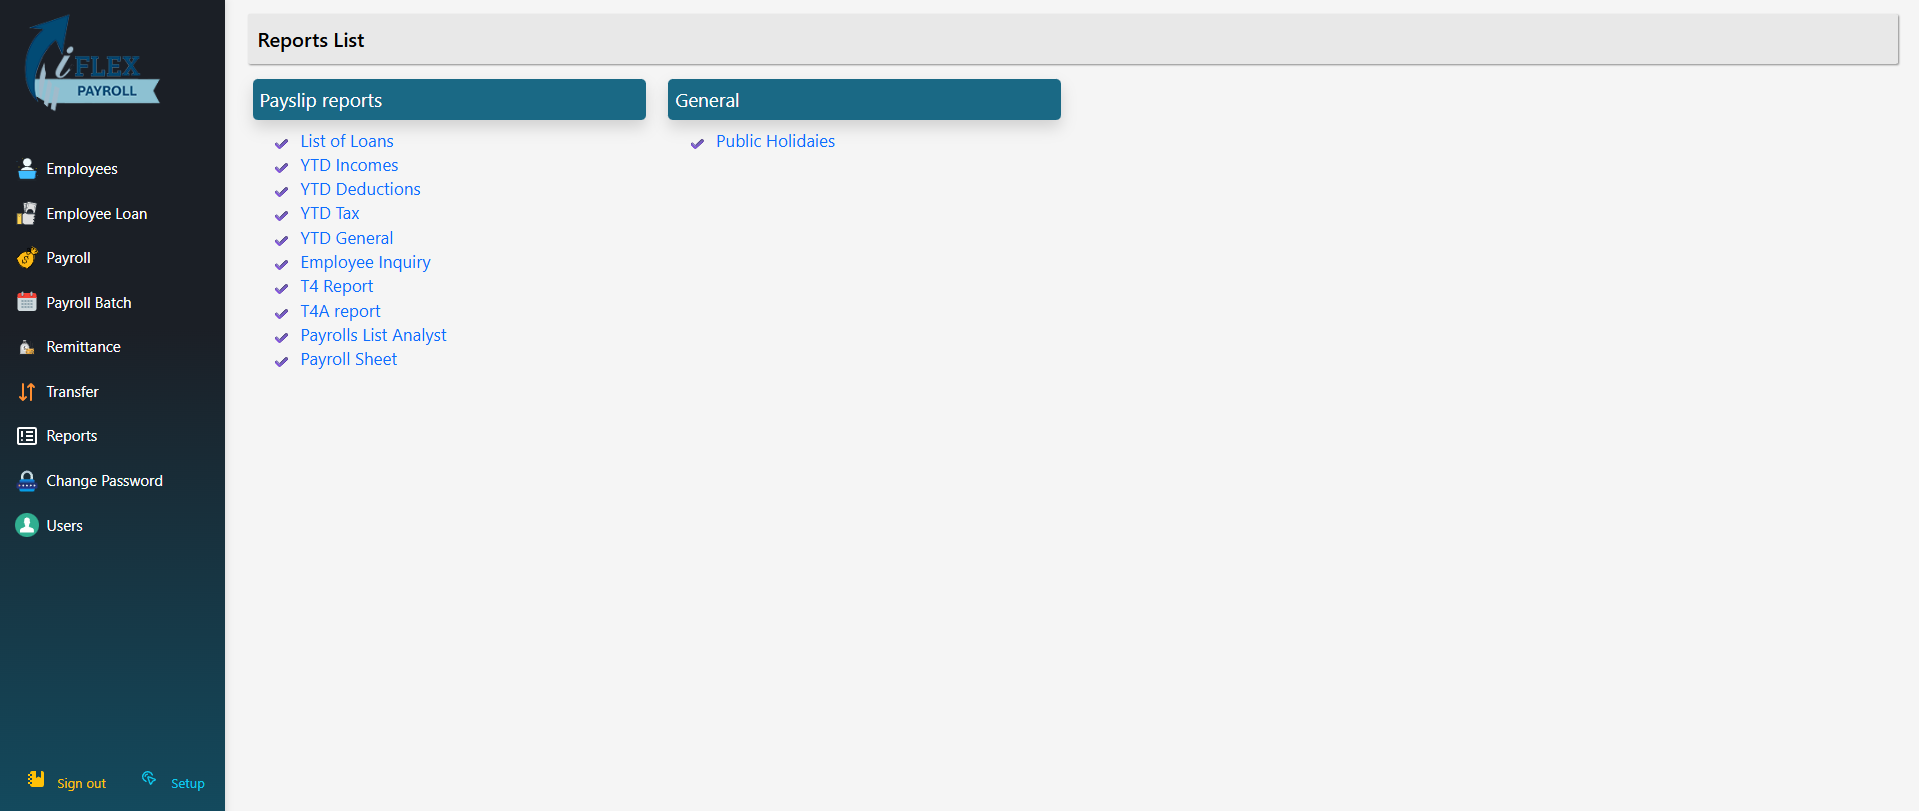
Payslip reports
The Payslip reports section contains payroll-related and employee financial reports. Click any report name to open it.
- List of Loans – Shows all employee loans and balances.
- YTD Incomes – Year-to-date employee income totals.
- YTD Deductions – Year-to-date deductions per employee.
- YTD Tax – Year-to-date tax amounts.
- YTD General – Combined year-to-date payroll summary.
- Employee Inquiry – Detailed payroll history for a specific employee.
- T4 Report – Generates T4 slips for employees.
- T4A Report – Generates T4A slips where applicable.
- Payrolls List Analyst – Analytical view of payroll runs.
- Payroll Sheet – Printable payroll sheet for records and review.
General reports
The General section contains reference and non-payroll-specific reports.
- Public Holidays – Displays statutory/public holidays used by the system.